Thursday, June 30, 2011

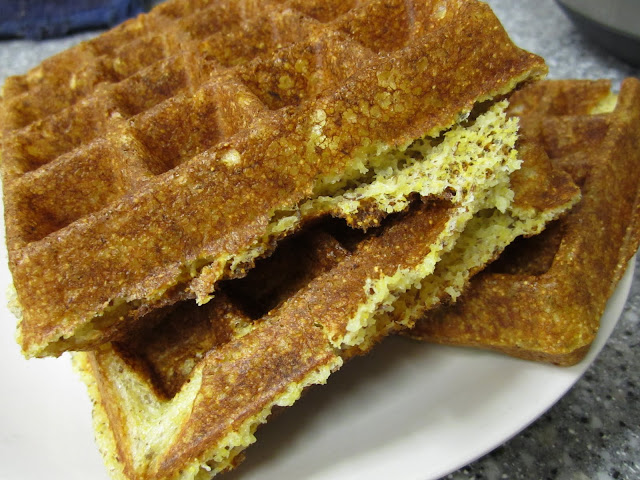
Cornmeal Flax Seeded Waffles...

Start off your day with a healthy breakfast by making this waffle recipe! Now I must warn you, these are not your average waffles! They are light and rich in flavor and not heavy laden with sugar. So top this wonderful waffle with fresh fruit and syrup/honey. Now get into the kitchen and whip up a batch of your own so you too can talk about how good healthy waffles can be!


Cornmeal Flax Seeded Waffles (Brenna)
Author: Brenna Bowers
Makes: 10-12 waffles

Ingredients:
1 cup all purpose flour
¾ cup yellow cornmeal (fine grind)
2 teaspoons baking powder
1 teaspoon baking soda
2 Tablespoons brown sugar
½ teaspoon cinnamon
¼ cup ground flax seed
3 large eggs
2 cups buttermilk (Tip 1)
4 Tablespoons vegetable oil
1 teaspoon vanilla

Directions:
In a large bowl, combine all the dry ingredients (flour through flax seed) and stir to combine.

In another bowl whisk the eggs, buttermilk, oil and vanilla. Add the flour mixture all at once and whisk just until combined (Tip 2).

Preheat the waffle iron and spray it with oil (or grease it with oil on a paper towel). Place about 1/3 cup of batter into the hot waffle iron (depending on the size of your waffle iron) and cook until the waffle is slightly golden brown (2-3 minutes).

Serve with fresh berries and honey/syrup.

Tip 1: If you have run out of buttermilk, don’t fret because I have a substitute for that! For every one cup of milk add 1 Tablespoon of fresh lemon juice. Let the mixture sit for about 5-10 minutes (it will begin to curdle….foam), stir and use as directed above.

Tip 2: Never overbeat waffle (or pancake) batter! This will make your product come out flat and chewy (opposite of what we want!). So just stir the batter a little bit and leave the small lumps….they will be just fine in there and you will never know once you place the batter into the hot griddle.

Monday, June 27, 2011

10 minute Pesto Breadsticks....

Whenever I purchase pesto, I always seem to have some leftover. Therefore, I found a great use for leftover pesto sauce and made this quick and easy recipe! I loves these as an appetizer or side dish to a meal!

Roll with a rolling pin to 1/8 inch thick

With a knife, slice the pizza dough into 1 inch thick strips

Dough has been rolled, pesto spread and cheese sprinkled

Give each breadstick a few twists and place it on the cookie sheet


Make sure to leave space for them to puff up when the bake

Baked to golden brown perfection


10 Minute Pesto Breadsticks
Author: Brenna Bowers
Makes: 10-12 breadsticks
Ingredients:
1 package pre-made pizza dough ( I like the pizza dough from Trader Joes)
¼ cup pesto
¼ cup grated parmesan.

Extras:
Foil
Pizza pan or baking sheet
Flour for dusting your countertop
Corn meal (for dusting the pan)
Rolling pin
Knife or pizza cutter

Directions:
Preheat the oven to 500 degrees F (or as hot as your oven goes).
Place foil on your baking sheet and then sprinkle corn meal on your pizza pan/baking sheet.

Remove the pizza dough from the fridge and allow it to come to room temperature (keep it in the package so that it does not try out in the air). When the dough is at room temperature, remove it from the package and place the dough on your counter top which has been dusted lightly with flour. Using your rolling pin, roll out the dough to about a 1/8 inch thickness. Cut the dough into 1” thick strips.
With a spoon, place pesto on only one side of the dough (about 1 Tablespoon of pesto per breadstick). Sprinkle a small amount of Parmesan cheese onto the breadstick.
Give each strip of dough a few twists and then place the breadstick on your prepared baking sheet. Do not place breadsticks to close together because you do not want them to stick to one another.

Allow the breadsticks to rest for 20-30 minutes before baking. This will make them fluffy!

Place in the oven and cook until the dough becomes golden brown (time varies depending on your dough thickness and oven temperature).

Serve hot and with pizza sauce or ranch!

Sunday, June 26, 2011

Put S'MORE Pumpkin Pancakes on the campfire!

Friends and I can always find ways to spice up the typical campfire breakfast...
So next time you plan on taking a camping trip don't skimp on breakfast.
Get the campfire a'blazing, mallow the sticks, and prepare the pumpkin pancake batter!
Pumpkin Chocolate Chip Pancakes topped with a roasted Marshmallow
Place the cast iron skillet over the red embers and cook slowly!

It's nothing fancy....this is camping!

This is the best part of camping!


S'MORE Pumpkin Pancakes
Author: Brenna Bowers
Makes: 4-5 servings


Ingredients:
1 box Trader Joe's Pumpkin Pancake Mix (Pumpkin Pancake Mix)
2 Tablespoons softened butter
3/4 cup milk
1 egg
½ cup chocolate chips
1 bag large marshmallows (because you will want to eat all the extras!)
syrup

Special tools needed on the camp fire:
Cast iron skillet
Oil spray
Spatula
Mixing bowl
Mixing spoon
Hot pad (to remove skillet from the flame)
Don’t forget plates and forks too!

Directions:
Light your camp fire. Allow the coals to cool down to just red hot embers.
Place the cast iron skillet on top of the grill or red embers.
In your mixing bowl, combine the pancake mix, butter, milk and egg. Stir until just combined (a few lumps are ok!)
Spray the skillet with oil spray.
Spoon the pancake mixture on the hot griddle and sprinkle with chocolate chips.

In the mean time, have you friends/ kids roast the marshmallows on a stick until golden brown.

Once the pancakes are cooked through on either side serve up with a toasted marshmallow and syrup!


Saturday, June 25, 2011

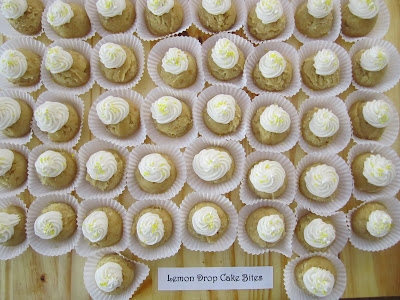
Lemon Drop Cake Bites

No need to puck your taste buds with these lemony cake bites! I created this dessert to be the perfect ratio of zesty lemon with a hint of creaminess and sweetness from the homemade cream cheese frosting! Bring this bite-size treat to your next party for a perfect pop-able finger food!

Brenna's Lemon Drop Cake Bites


Lemon Drop Cake Bites (Brenna)
Author: Brenna Bowers

Makes: 30-40 cake bites

 
Ingredients:
1 white cake mix
1 package lemon instant pudding (4 serving size)
4 egg whites
2 Tablespoons oil (not olive oil)
1 cup water

Frosting:
1 package cream cheese
¼ cup butter, softened
2 Tablespoons fresh lemon juice
3 ¾ cups powdered sugar

Candy cups (the wrapper you find on Mini Reese’s) (found at specialty cake stores or some grocery stores in the baking isle)
Sprinkles for garnish

Directions:
Cake:
Preheat the oven to 350 degrees F. 

In a large mixing bowl combine the cake mix, lemon pudding, egg whites, oil and water. Beat until well mixed; about 2 minutes. Spray a 13x9 inch baking dish with oil and pour in the cake batter. Bake for about 20-25 minutes (or until an inserted toothpick comes out clean). 

Remove the cake from the oven and let it cool completely (do not skip this step!). With clean hands, tear up the cake into small pieces and place the cake scraps in a large bowl.

Frosting:
In a medium size mixing bowl, beat the cream cheese and butter until fluffy. Add in the lemon juice and beat again until completely combined. Next, add in the powdered sugar and beat until smooth.

Assembly:
Add ¼ cup of the frosting into the crumbled up cake mixture. With a wooden spoon, stir the cake mixture just until all the frosting is mixed into the crumbled cake and you can pinch the mixture between your fingers and it will hold. Add more frosting if your cake does not stick together. With a Tablespoon measurement, scoop the cake mixture and form it into a uniform ball with the palm of your hands. Place each cake bite into the candy wrapper.

Place your frosting into a piping bag with a piping tip (or place into a sandwich baggie and cut the tip) and swirl on top of each cake bite. Sprinkle with sprinkles!


*To store: Keep refrigerated for up to 3 days, covered with plastic or in a airtight container!

Friday, June 24, 2011

Mango, Blueberry and Caramelized Onion Salad....

Believe it or not, this is one of the best salads I have had in my life!
Simply make this recipe just as it says and wow your mouth!


Mango, Blueberry and Caramelized Onion Salad
Illustrated and edited by: Brenna Bowers

Ingredients:
Balsamic Vinaigrette:
1 Tablespoon balsamic vinegar
1 Tablespoon olive oil
1 clove garlic, minced
½ Tablespoon dijon mustard
1 Tablespoon sugar
Salt and pepper

Salad:
¼ cup pine nuts, toasted
1 large red onion, sliced in 1/8” thin half moons
1 Tablespoon olive oil
1 Tablespoon balsamic vinegar
1 teaspoon brown sugar
1 medium mango, peeled, seeded, cut in into bite-size pieces
2 cups fresh blueberries
2 ounces goat cheese
12 ounces fresh arugula or spinach (about 4 cups)

Directions:
Balsamic Vinaigrette Dressing:
Whisk the balsamic vinegar, sugar, mustard and garlic together. Slowly whisk in the olive oil. Add salt and pepper to taste

Salad:
Toast the pine nuts in a skillet over medium heat until they are slightly browned. Set aside to cool. In the same skillet, sauté the onions in the olive oil, add the balsamic vinegar and brown sugar (Tip 1). Cook low and very slow stirring once in a while until the onions turn a golden brown color all the way through.
Meanwhile, slice the mango and wash the blueberries and greens. Place all the ingredients (caramelized onions, mango, blueberries, crumbled up bits of goat cheese, pine nuts and greens) into a large bowl and add half of the dressing and toss(adding more dressing only if necessary).


Tip 1: Caramelizing Onions: The purpose of caramelizing onions is to draw out the natural sugars that are in onions. The trick to caramelizing onions is to keep the flame at a low temperature. This process takes quite a bit of time but is well worth the wait! You never want the onions to just brown on the edges (that means they are burning) rather you want the onions to turn golden brown all the way through. The key is to stir the onions once in a while and if you feel they are beginning to burn, add a dash of water to steam the mixture. Caramelizing onions is a labor of love….but worth it!

Thursday, June 23, 2011

Carrot and Apple Salad with a hint of Mint....

Recently I attended a free cooking class at the UCSD Medical Center in San Diego, CA. The class is called the  "Healthy Eating Program".

"We believe that food nourishes the body, nurtures the spirit, and is essential for health and healing. Our Research focuses on helping people adopt diet and other lifestyle changes that can help prevent and control diseases like cancer. We are now offering counseling services to the public." (UCSD Medical Center)

Check out their website to sign up for these amazing classes at:
http://www.healthyeatingucsd.org/

This past week, the topic was about Phytochemicals. These are compounds that occur naturally in bright colored food such as fruits and vegetables. Phytochemicals contain many nutrients for your body and may help reduce future ailments and cancers.

This recipe was taught in the Healing Foods class but I have adjusted it to my liking! Hope you enjoy as well!


Carrot and Apple Salad with a hint of Mint
Author: Brenna Bowers (adapted from Healing Foods Class)
Makes: 8 servings

Ingredients:
6 Tablespoons rice vinegar
2 Tablespoons balsamic vinegar
2 Tablespoons olive oil
1 Tablespoons honey
4 apples (Fuji, Gala or Pink Lady….an apple that is high in sugar content)
4 large carrots, peeled and shredded
1 Tablespoons fresh grated ginger
1 cup dried cranberries
½ cup toasted slivered almonds
Dash of salt and pepper
½ cup torn fresh mint leaves

Directions:
In a blender, mix the rice vinegar, balsamic vinegar, olive oil and honey. Blend until it is smooth and emulsified (mixed all together and does not separate).

With a food processor, shred the apples (skin can be left on), carrots (peeled) and ginger (peeled).

Toss the apples, carrots, ginger, cranberries and slivered almonds in a bowl. Sprinkle with salt and pepper. Pour the dressing over the mixture and stir until it is evenly coated. Garnish with the torn mint leaves. 

Refrigerate or eat!

Wednesday, June 22, 2011

Grapefruit and Lemonade Spritzer....

Something bubbly - something sweet - something with a tang - something with amazing flavor.......

How about a Grapefruit and Lemonade Spritzer!?

I created this recipe with summertime in mind. This is the perfect beverage for a party or to make you feel refreshed.


Grapefruit and Lemonade Spritzer
Author: Brenna Bowers
Makes: 1.5 liters
Ingredients:
1 cup sugar
1 cup filtered water
1 Liter Sparkling Water (Club Soda or 7UP work too)
3 fresh squeezed lemons
1 large fresh squeezed grapefruit
Ice
Springs of mint (optional)

Directions:
In a small sauce pot, bring the one cup filtered water to a boil. Stir in the 1 cup of sugar. Remove the mixture from the heat and stir until the sugar is fully dissolved. Pour the sugar water into a pitcher. Add the sparkling water, lemon juice, grapefruit juice, (sprigs of mint) and ice.

Serve on a hot summer day!

Tuesday, June 21, 2011

Crostini with Fresh Berries and Honey Goat Cheese...

I know what you are thinking! What is Crostini???

Crostini (meaning "little toasts" in Italian) is an Italian appetizer consisting of small slices of grilled or toasted bread and toppings. (http://en.wikipedia.org/wiki/Crostini)

Honey Goat Cheese from Trader Joe's is amongst one of my favorite products on the market. It is a flavorful cheese made of goat's milk and has a hint of sweetness because it is infused with honey. This goat cheese tastes wonderful with the fresh summer fruits that are available right now!

Below you can see pictures of the Crostini with Fresh Berries and Honey Goat Cheese that I made for an event recently. It was quite a hit! I made about 200 of these little bite size foods and not a single one was left!

The crostini has been topped with strawberries, blueberries and raspberries

 
The Trader Joe’s Honey Goat Cheese can be found in the refrigerator section of your local store and the product’s name reads “Chevre with Honey” . 

“What is Chevre?”, you may ask? That is the French word for "goat"-practical huh!?

http://www.notsuperhuman.com/2010/08/this-is-good/ (picture source)

A creamy goat's milk cheese with a hint of sweetness from the honey.
 
Crostini with Fresh Berries and Honey Goat Cheese
Author: Brenna Bowers
Makes: 20-30 bite size Crostini


Ingredients:
1 Plain French Baguette (1 ½” diameter) (Tip 1)
8 oz. Honey Goat Cheese
1 small package fresh berries (blueberries, strawberries, blackberries, raspberries, etc…)
About 3 Tablespoons honey

Directions:
Preheat the oven to "broil" (this is a setting on the oven where the heat comes from the top of the oven only and gives off intense heat).

Begin by slicing the French Baguette into ½” thick rounds. The more evenly you slice the crostini the more evenly the will bake. Place all the bread rounds on a dry cookie sheet in a single layer (if you have extra, place them on a second cookie sheet). Place the cookie sheet with the bread slices in the oven and broil for about 4 minutes (or until the bread hardens and turns very light brown) (watch it very carefully for it burns fast!).

Spread a small amount of the Honey Goat cheese on each crostini with a knife. Top each crostini with fresh berries and drizzle with honey.

*best if made the day of service


Tip 1: When purchasing a French Baguette (plain French Bread) for this recipe, look for something long and skinny. If you want to cut down on preparation time, you can purchase pre-made Crostini at many local bakeries or grocery stores.

Friday, June 17, 2011

Walnut Encrusted Salmon with White Wine Mushrooms...

Its time to eat fish! Don't be scared of it but rather just try it! This is a simple recipe, full in flavor, and rich in nutrients! Fish is lean, so it is less fatty than red meat or pork and it full of "good fats" called omega-3. This dish is good for you and has the potential to become your families favorite!

Let's get cooking!

Walnut Encrusted Salmon with White Wine Mushrooms (and Yorkshire Pudding)


Salmon with onion-garlic-butter mixture and nuts...ready to be baked


You can tell it has been cooked because it has turned opaque orange

White wine mushroom mixture

Time to EAT!

Walnut Encrusted Salmon and White Wine Mushrooms
Author: Brenna Bowers
Makes: 4 servings


Ingredients:
16 oz. fresh caught salmon (with skin) (about 1” to 1 ½” thickness) (about 4 oz per person) (Tip 1)
3 Tablespoons butter, divided
1 small white onion, minced and divided
3 cloves of garlic, minced and divided
1-2 springs fresh rosemary, minced
3 leaves fresh basil, chopped finely
½ cup toasted walnuts, roughly chopped

1 Tablespoon olive oil
2 cups mushrooms, sliced thin
Salt and pepper
½ cup white wine
½ cup Milk (2 percent is best)


Directions:
Preheat the oven to 375 degrees F.

In a small pan, melt 2 Tablespoons of the butter over the stove. Add in half of the minced garlic, half of the chopped onion, all of the fresh rosemary, basil, and add in a pinch of salt and pepper. Allow the mixture to cook on low heat about 2 minutes or until the butter begins to smell fragrant and sweet (pull from the heat if the butter or onions start to brown).

Place tin foil on a baking sheet, spray with olive oil and place the salmon skin side down. Pat the salmon dry with a paper towel. Pour the butter-onion-garlic mixture over the fish and spread evenly. Place the toasted walnuts on top and press them lightly onto the salmon. Place into the oven for 12-18 minutes. (Tip 2)

In a large sauce pan, add the remaining 1 Tablespoon of butter, 1 Tablespoon of olive oil, the other half of the chopped onions, and all of the mushrooms. On low and slow heat, sauté the mushrooms (they should begin to melt down and shrink in size as they release their juices). After about 5 minutes, add in the garlic, salt and pepper. Cook, stirring occasionally for 2 more minutes and add in the white wine. Allow the mixture to simmer for 5 minutes and then add in the milk. Stir this mixture and cook until the mushrooms are tender and the sauce thickens and reduces (about 10 minutes or more).

Assembly:
Cut the salmon into serving sizes, leaving the skin on or off depending on your preference. Place the salmon on each plate and top with the mushroom mixture.

*I served my meal with Yorkshire Pudding” on the side


Tip 1: To choose a good salmon, look for the bright color orange, you do not want it to look slimy or feel slimy (that would mean it’s a little old).

Tip 2: To know when your salmon is ready, you want to look for the color of the fish to turn form vibrant dark orange to a lighter and opaque orange color. Poke a knife into the center of the thickest part of the fish and look to see if the color has changed all the way through. Remove from the oven as soon as the color has changed almost completely through and cover with foil. Let the fish rest on the counter about 5 minutes to allow it to finish cooking and retain the juices.

Thursday, June 16, 2011

Grilled Hearts of Romaine with a Homemade Vinaigrette and Gourmet Cheese...

Summer is finally here!!!!! Therefore it is time to light the BBQ, call out your friends for a dinner party and make a new summery yet trendy dish.
This is the easiest salad to make and will make your guests say "YUMMMM!"
My grandma was the first to tell me about this recipe and I have since then tweaked it to be my own recipe....hope you and your friends enjoy!

Grilled Hearts of Romaine with a homemade Vinairette and Gourmet Cheese

Homemade Vinaigrette

Romaine cut in half and ready to be brushed with Olive Oil

The grill is hot and the Romaine ready to be chared


Place the Romaine cut-side down on the hot grill

You want the golden brown color and just some char to the leaves

Grill for 1 min then turn at a 45 degree angle for beautiful grill marks


ENJOYYYYY!


Grilled Hearts of Romaine 
with a Homemade Vinaigrette and Gourmet Cheese
Author: Brenna Bowers
Makes: 4-6 servings


Ingredients:
3 Tablespoons Extra Virgin Olive Oil (or any oil will work), divided
1 Tablespoons fresh squeezed lemon juice
1 small clove garlic, minced
½ teaspoon Dijon (or grainy mustard)
1/4 teaspoon Worcestershire
2 Tablespoons balsamic vinegar
1 Tablespoon honey
¼ teaspoon pepper
1/8 teaspoon Italian seasonings
Dash of salt
2 or 3 Whole heads of Romaine Lettuce
1/8 cup toasted walnuts, roughly chopped
3 Tablespoons Gourmet Cheese (crumbled Parmesan, Feta, Blue cheese, or Goat Cheese)

Directions:

Dressing:
In a small bowl, whisk 2 Tablespoons of Extra Virgin Olive Oil, fresh lemon juice, garlic, Dijon (Tip 1), Worcestershire, balsamic vinegar, honey, pepper, Italian seasonings and salt. Set aside or chill.

Hearts of Romain Lettuce:
Wash the heads of Romaine lettuce and pat it dry with paper towels. Remove any wilted outer leaves if necessary. With a sharp knife, slice each Romaine heart in half length-wise.
Brush or drizzle the cut-side up Romaine hearts with the reserved 1 Tablespoon of olive oil.

Assembly:
Heat up the grill/BBQ to very high heat. When you place your hand over the heat, it should be too hot to leave your hand there for more than 2-3 seconds. Place each of the Romaine hearts cut-side down for about 2 minutes; or until grill marks appear and you have charred the edges. Immediately remove the lettuce from the heat and set aside. So serve, place the Romaine hearts on each plate and drizzle with the homemade dressing, crumbled cheese and toasted nuts.


Tip 1: Dijon is added to the dressing not just for flavor but because mustard helps act as an emulsifier. Now less shaking is required for your dressing and it will be less separated.