Showing posts with label cookie. Show all posts

Saturday, January 12, 2013

Sugar Cookies - Thick and Chewy - Buffalo...

The day has finally arrived....a day I can proudly say the perfect THICK & CHEWY sugar cookie has come into existence! It has been years of testing, practice, trial and error but look no further for the recipe is here!

Brenna's Thick and Chewy Sugar Cookie Tips:
Dough stage - Butter must be room temperature (not melted, not cold). Beat the butter and sugar for 5 or more minutes (should turn fluffy and light white in color). When dough is formed, wrap and chill at the very least 30 minutes.
Rolling stage - Roll the cookies 1/3" to 1/2" thick. Yes, that thick. Place on a cooled cookie sheet. Place in the refrigerator 15 or so minutes (to re-chill the butter) before baking in the oven.
Baking stage - Bake only 6-7 minutes - the cookies will still be soft to the touch and pale in color (not golden brown).


1st stage of creaming the butter and sugar

2nd stage of creaming the butter and sugar

3rd (and final) stage of creaming the butter and sugar

Perfectly creamed butter and sugar (5 minutes later)

Evenly mix all the wet ingredients

Place the dough on a lightly floured surface

Pat the dough into a disk and then wrap with plastic and chill

Roll to 1/3" to 1/2" thickness

Roll to 1/3" to 1/2" thickness

Bake 6-7 minutes - still pale in color

Thick and fluffy!


Piping bag and small round tip (or use Ziplock baggies)

Place over a cup to easily pour in frosting without a mess

Wilton's Gel Food Coloring - the best


Just pipe around the edges - let it dry completely
Fill in the spaces


-->
Sugar Cookies Thick and Chewy (Holly)
Author: Brenna Bowers
Serving: 30-40 thick cookies (about 2-3” each)


Ingredients:
1 cup salted butter (if using unsalted butter, add another ½ tsp of salt), room temp
2 cups sugar
2 eggs
3 tsp. vanilla extract
1 tsp. almond extract
1 cup sour cream
1/2 tsp. salt
2 tsp. baking soda
7 cups flour

Frosting:
4 cups powdered sugar*
2 tsp vanilla extract
4 Tbs milk
brown gel food coloring

chocolate/brown sprinkles

*chocolate frosting: substitute 3 Tbs. of powdered sugar for unsweetened cocoa powder

Directions:
In an electric mixer, cream the butter and sugar for 5 minutes - or until light white and fluffy. Add eggs, vanilla extract and almond extract; beating until evenly mixed. Add sour cream and again, beat until just mixed.

In another large bowl, combine salt, baking soda and flour. Add to the wet mixture, in 3 additions, mixing in between each addition. Mix just until it forms a dough.

Sprinkle your counter with a light dusting of flour. Press the dough into a circular disk, adding enough flour to just keep the dough from sticking to the counter. Place into the refrigerator 30-60 minutes.

With a rolling pin (or wine bottle) roll out the dough on a lightly floured surface to about 1/3” -1/2” thick. Really. And press with a cookie cutter. Use a spatula to carefully slide under each cookie and place onto a parchment-lined cookie sheets (Tip 1).

Bake at 375 degrees F. for 6-7 minutes. THEY WILL NOT LOOK DONE…BUT THEY ARE! Leave them on the cookie sheet to cool completely before moving to prevent cracking the cookie.  

Frosting:
In an electric mixer, beat all the ingredients together until evenly mixed. It should be slightly runny, adjust with more powdered sugar or milk.
Place a small piping tip into a pastry bag (or use a Ziplock plastic baggie and cut the tip) and fill with the prepared frosting.

Outline each cookie and let the frosting harden. Then go back in and pipe the frosting to fill each cookie. Top with chocolate sprinkles.


Tip 1: (Optional) Sugar cookies have the tendency to flatten as they bake, therefore they loose their detail. To prevent this, start by placing rolled cookies onto a cooled parchment-lined cookie sheet. Secondly, place the cookie sheet into the refrigerator 10-15 minutes to re-chill the butter in the dough and then place straight into the oven for baking.


Wednesday, November 30, 2011

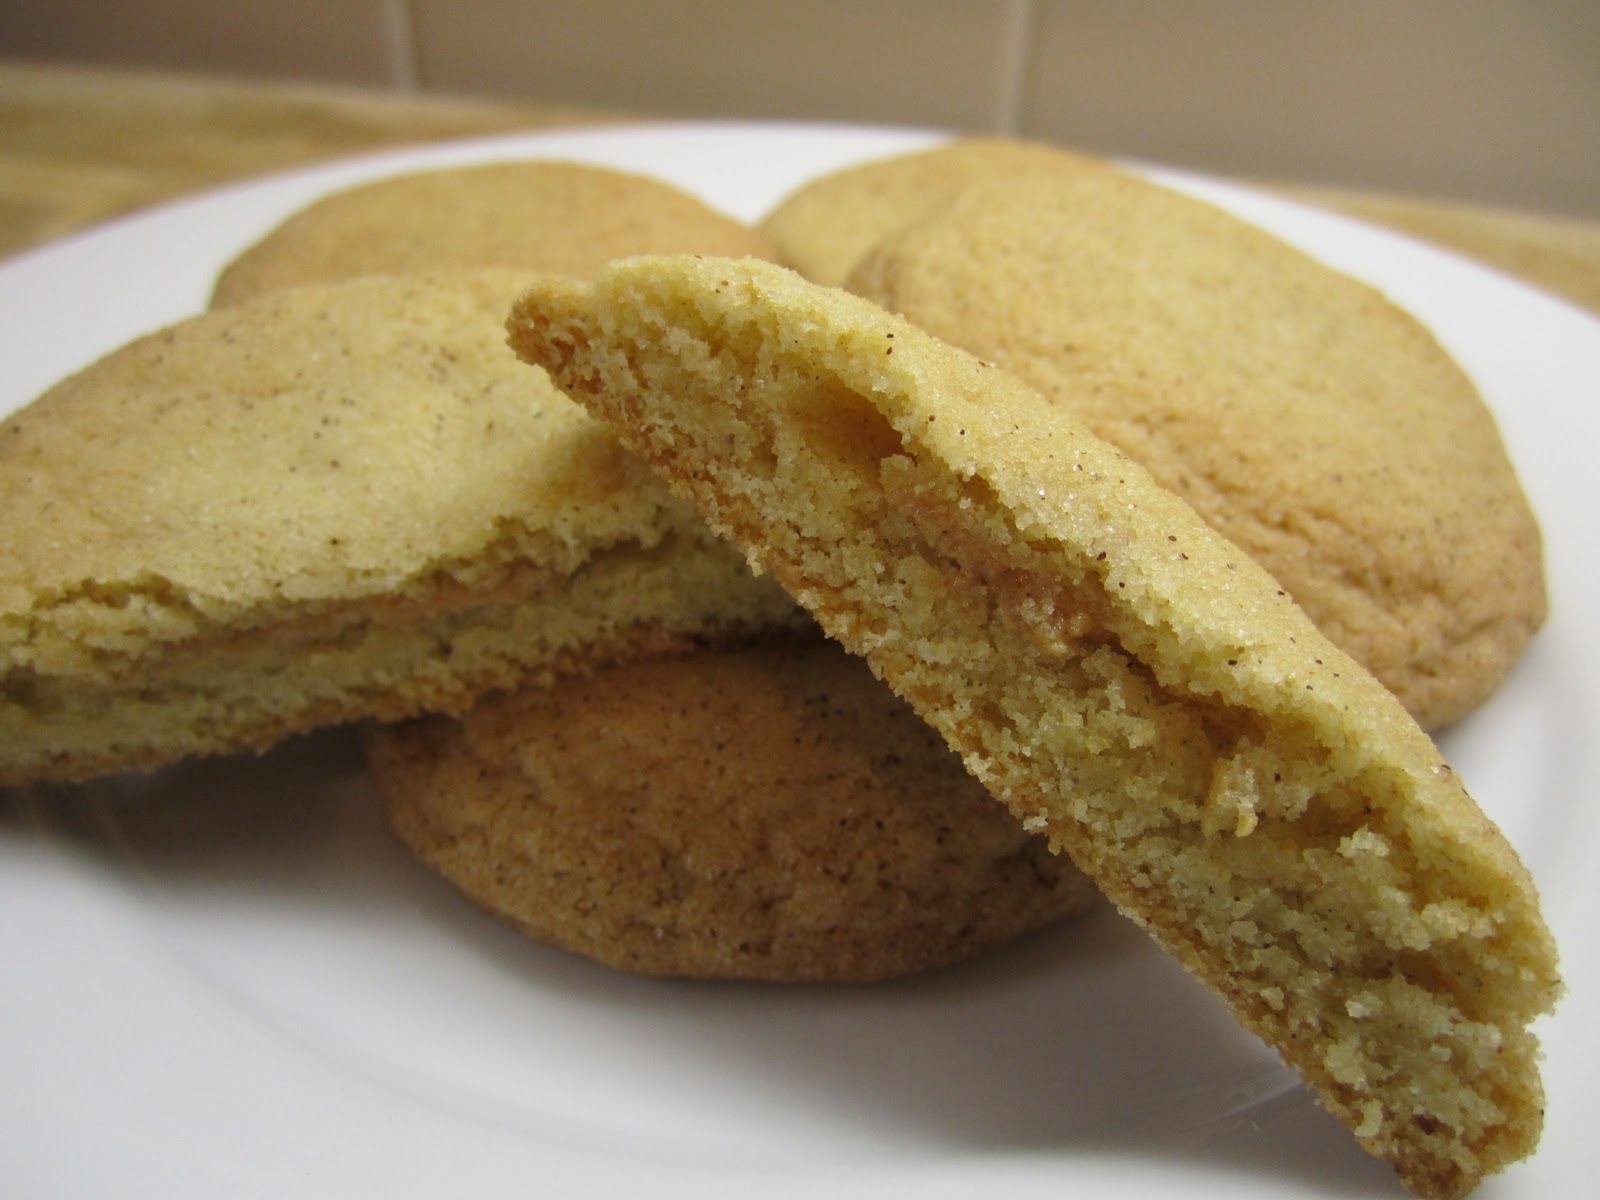
Snickerdoodles Hidden with Peanut Butter...

One of my families' holiday traditions is a Cookie Exchange. Friends are invited over to the house and show up with their favorite Christmas cookie recipe and ingredients. Everyone makes their batch of cookies together in the kitchen and then the cookies get baked off. When parting ways, everyone exchanges cookies leaving with a whole plate of various holiday cookies! This is a recipe would be perfect for a time like this!

Peanut Butter is hidden in the center!!!!

Cream this mixture: to whip air into the batter

Notice it is fluffy and light in color. Well "creamed'

Dry ingredients

The snickerdoodle dough

Flatten the dough balls into the 1/4" disks.

Spoon a small dollop of peanut butter on each disk of dough.

Place another disk on top of the peanut butter and press the edges well!

Roll in Cinnamon-Sugar mixture.

Perfectly baked to light golden color.


Snickerdoodles Hidden with Peanut Butter
Author: Brenna Bowers
Serving: 24 cookies


Ingredients:
1 cup butter, room temperature
1 ½ cup white sugar
2 eggs
½ teaspoon vanilla extract
2 ¾ cup all purpose flour
2 teaspoons cream of tartar*
1 teaspoon baking soda
¼ teaspoon salt
½ teaspoon cinnamon
¼ teaspoon nutmeg

Filling:
¼ cup creamy peanut butter

Cinnamon-sugar Mixture:
3 Tablespoons sugar
3 teaspoons cinnamon


Directions:
Cream (Tip 1) butter, sugar and eggs until light and fluffy. Stir in vanilla. Add flour, cream of tartar, baking soda, salt, cinnamon and nutmeg; mix until just combined. Place plastic wrap over the dough and chill for 1 hour (Tip 2).

Roll 1½ teaspoon size dough balls in your palms and then flatten into a disk (about ¼” thick). Add a ½ teaspoon of peanut butter in the center. Roll and flatten another disk of dough to place on top of the dough with the peanut butter. Purse the edges of the dough well to trap the peanut butter into the middle. Roll into the cinnamon-sugar mixture to coat the outside. Place onto an ungreased cookie sheet.

Bake at 350 degrees (F) for 9 minutes.


Tip 1: To “cream” means to whip the batter with hand beaters or a whisk by hand until the batter becomes lighter in color and fluffy. This is a process of incorporating air into your batter.

Tip 2: It is important that you chill the batter if you want your cookies to end up chewy and fluffy. It is important that the butter is firm before you put the cookies into the oven for baking. This will keep the structure of the cookie as it bakes and the end result will be a deliciously fluffy yet chewy cookie.
*Cream of Tartar: There is not a good substitute for this product. Do not even try substituting with baking powder or baking soda. I tried and the cookies ended up with a crumbly texture and far from chewy and soft like I prefer.

Thursday, March 24, 2011

Carrot Cake Cookies- these make me smile...

As many of you well know, amongst one of my favorite foods is Carrot Cake. I am constantly looking for more ways to use carrots in my baked goods.....this is one more  wonderful recipe that does the trick! These cookies are very easy to make, a recipe your friends will really enjoy, and tastes great warmed up in the microwave or chilled in the freezer.
Make this recipe your own by adding ingredients such as ginger, allspice, raisins, different nuts, etc

*I personally have adjusted this Martha Stewart recipe, making it my own by adding maple flavoring, more cinnamon, less nutmeg, nuts instead of raisins, and omitting the ginger... cause that is just how I like it :)

A delicious Carrot Cake Cookie Sandwich with Cream Cheese frosting in the center.

It is moist, chewy, and mmmhhmmmm gooood!

I opted to make these cookies small and bite size for my guests.

Notice how much the cookies spread in the oven.

Believe me, this cookie is equally as good as Carrot Cake itself!


Carrot Cake Cookies (Brenna)
Author: Brenna Bowers  (adapted and adjusted from Martha Stewart)
Makes: about 20 cookie sandwiches


Ingredients:
1 cup brown sugar
1 cup white sugar
2 sticks butter, room temperature
2 eggs, room temperature
1 teaspoon vanilla extract
1/4 teaspoon maple flavoring
2 cups flour
1 teaspoon baking soda
1 teaspoon baking powder
1/4 teaspoon salt
1 teaspoon ground cinnamon
1/4 teaspoon ground nutmeg
2 cups quick oats
1 1/2 cups finely grated carrots, (about 3 large carrots)
1 cup walnuts, chopped (optional)


Cream Cheese Frosting:
6 ounces cream cheese
1 Tablespoon milk
1 teaspoons vanilla
4 cups powdered sugar


Directions:
Carrot Cake Cookies:
In a large bowl, add the brown sugar, white sugar and butter; beating until light and fluffy (about 4 minutes). Next, add the eggs, vanilla extract and maple flavoring mixing the dough just until evenly combined.

In another large bowl, mix the flour, baking soda, baking powder, salt, cinnamon and nutmeg. Add the flour mixture into the butter mixture; mixing just until the batter is combined. Stir in the oats, shredded carrots (and nuts). Refrigerate the dough until firm, about 1 hour.

Preheat the oven to 350 degrees Fahrenheit. Line a baking sheet with a Silpat or parchment paper.

Spoon about 1 Tablespoon of dough onto prepared baking sheets, leaving 2 inches between each cook (they spread out quite a bit). Bake for about 15 minutes (it is better to pull the cookies out sooner than later to make chewy cookies!). Allow the cookies to cool completely before frosting them.


Cream Cheese Frosting:
Beat the cream cheese, milk, and vanilla on low speed until smooth. Gradually add powdered sugar one cup at a time. Whip the frosting for about 2 minutes once all the ingredients have been combined to make the frosting fluffier.

Assembly:
Place about 1 teaspoon of frosting on the bottom of a cooled cookie. Place another cookie on top to form a cookie sandwich.

Storage:
Place the cookies in an airtight container for up to 3 days in the refrigerator or freeze them for up to 2 months.


Saturday, December 18, 2010

Jazzed up Chewy Oatmeal Raisin Cookies...

Nothing quite like a freshly baked Oatmeal Raisin Cookie...that's chewy!
Full of cinnamon and maple flavor along with hardiness and texture from the oats and nuts....you can't just take one bite!
Chewy Oatmeal Raisin Cookie with lots of flavor!
 Cookie dough- good if just eaten with a spoon or frozen!
 Not a fan of raisins?-exchange for chocolate chips or white chocolate chips

Remove from the oven if you like it even more chewy than this!


Oatmeal Raisin Cookie
Author: Brenna Bowers
Serving: about 15-20 cookies...depending on how much dough you eat :)

Ingredients:
2 sticks butter
1 cup brown sugar
1/2 cup granular (white) sugar
2 Tbs honey
2 eggs
1 tsp vanilla
¼ tsp maple flavoring
1 ½ cups flour
3 cups quick oats
1 tsp baking soda
1 ½ tsp cinnamon
½ tsp salt
1 cup raisins*
1/2 cup walnuts, chopped**

Directions:
In a small bowl, beat the butter, brown sugar, granular (white) sugar and honey until whipped and fluffy (about 2 minutes). Add the eggs, vanilla, and maple extract and beat until incorporated.
In another bowl, stir and combine the flour, quick oats, baking soda, cinnamon and salt.
Add half of the flour and oat mixture to the butter mixture and stir until just combined. Add the rest of the flour and stir until fully combined. Add in the raisins (and walnuts) and stir with a wooden spoon.

Place heaping spoonfuls (about 3 Tbs. of dough) on a cookie sheet and slightly flatten and form the dough into a cookie shape (they do not flatten much as they cook so you must help the process). Bake at 350 degrees F for 10-12 minutes (it is better to pull the cookies from the oven when they are barley golden brown and still gooey for a more chewy cookie!)

Mmmmm….eat up!

*don’t like raisins?? Substitute with chocolate chips or even white chocolate chips!

** add walnuts or any kind of nuts you prefer…or omit completely