Thursday, February 2, 2012

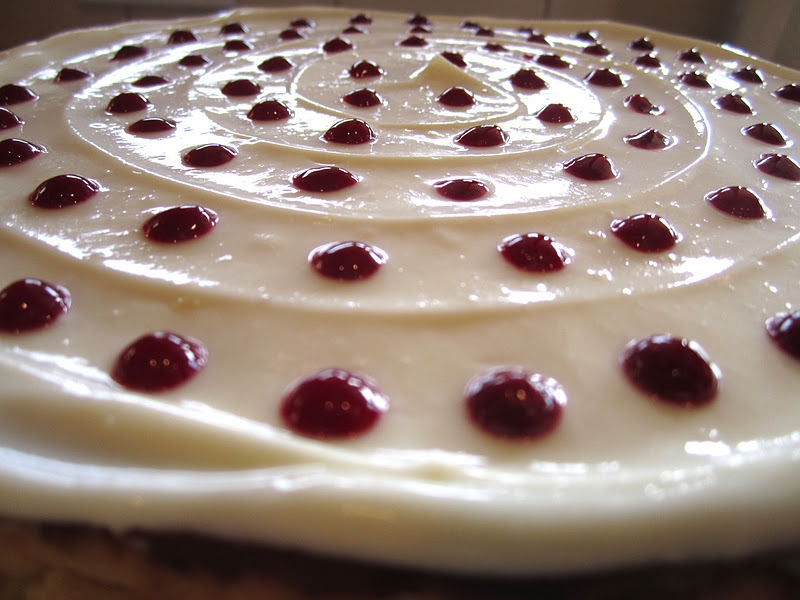
Love Filled New York Lemon Cheesecake with Raspberry Hearts....

How about something special for those you love?! And if they didn't love you before, they are bound to love you now! :)

This particular cheesecake was made for the birthday of someone special to me, Mr. Rose--Happy Birthday!!!!

New York Lemon Cheesecake with Raspberry Hearts

This cheesecake makes a statement in its flavor and presentation.

Evenly smooth out the sour cream-lemon curd topping.

Evenly place raspberry dots using a piping bag and tip.


All you need is a piping bag, small round piping tip and a toothpick

Drag the toothpick in a circular motion, NEVER stop and pick back up!


 Heart Decorated Cheesecake
New York Lemon Cheesecake with Raspberry Hearts
Author: Brenna Bowers

An easy way to decorate without skimping on the 'WOW' factor!

Ingredients:
1/4 cup frozen raspberries
4 Tablespoons orange juice
2 Tablespoons white sugar
1 Homemade New York Cheesecake, chilled (my favorite author:America's Test Kitchen)
1/2 cup lemon curd (my favorite brand: Trader Joe's)
1 1/2 cups sour cream


Extra tools: fine strainer, piping bag, small round piping tip, toothpick

Directions:
In a small sauce pot on low heat , stir the raspberries, orange juice and sugar. Allow to simmer very low and slow for 10-15 minutes. (The mixture should become thicker than liquid but thinner than jam.) Cook longer or add a splash more orange juice if the consistency is not correct. Discard the seeds by passing the hot mixture through a fine strainer using a spatula. Allow to cool. Place into the piping bag with a piping tip. 

In a small bowl, mix the sour cream and lemon curd. Spread onto the cooled cheesecake. Spread evenly with a spatula or back of a large spoon staring at the outer-edge of the cheesecake (spin the plate rather than your arm for perfect rings). 

Pipe dots (smaller than the size of a chocolate chip) evenly spaced in a spiral until the entire cheesecake is covered. 

Beginning with the dot on the outer most edge, drag a toothpick through each dot. NEVER PICK UP the toothpick unless you have drug the point through the end of the last dot.

Chill-Serve-Eat-Repeat. 


Sunday, January 22, 2012

Apple Galette...

I know what you are thinking, "Brenna, what is the world is a Galette?". 

Well let me tell you, that is a great question!

Galette vs. Pie-- a Galette has one crust, leaving the center uncovered and requires no pie plate.  This offers a more rustic looking dessert and makes the preparation process 'easier than pie'. On the other hand, pie has 2 crusts and is placed into a pie plate. 

Apple Galette

Granny Smith apples before they have been cooked down.

Cooked down apples with butter, sugar,  cinnamon and nutmeg.

Lay the apples in an even spiral layer, leaving a 1" border.

Overlap the pie crust to make the unique form of a Galette.

The finished product, brushed with the optional apricot jelly.

Apple Galette
Author: Brenna
Makes: 1 Galette, 6-8 servings

 
Ingredients:
1 pie crust.
flour (for dusting)
3 large Cooking apples*, peeled and thinly sliced
2 Tablespoons butter
1 teaspoon fresh lemon juice
1/8 cup brown sugar
1/8 cup white sugar
1 teaspoon cinnamon
¼ teaspoon freshly ground nutmeg
1 Tablespoon apricot jelly  (*optional)

Directions:
Preheat oven to 400 degrees F.
Line a baking sheet with parchment paper.
On a flat surface, sprinkle with a light dusting of flour (this will keep the pie crust from sticking on the counter). Roll out to an 10” circle. Place on the prepared baking sheet.

In a medium sauce pot melt the butter. Add in the sliced apples and lemon juice and cook on med-low heat until slightly tender with the lid on (to create steam); about 8-10 minutes. Remove from the heat and toss in brown sugar, white sugar, cinnamon, and nutmeg: lightly tossing to evenly coat the apples.  Let the mixture cool (Tip 1). Evenly arrange the apple mixture in a spiral on the surface of the pie crust leaving a 1” border. Fold over the edges of the pie crust over the apple mixture, fluting the edges (Tip 2).

Bake for 20-25 minutes.

Optional step for a shiny crust (as in the picture shown)--Once baked, remove from oven and brush with the apricot jelly (may need to be zapped in the microwave to heat it up). Replace in the oven for 5 more minutes to allow the pie crust to brown.

Serve hot and with French Vanilla Ice Cream!


Tip 1: Pie crust has a high content of butter/fat which needs to be chilled for proper baking. Therefore if you place a hot apple mixture onto the crust, it will melt the butter causing the pie crust to tear.

Tip 2: Galette vs. Pie-- a Galette has one crust, leaving the center uncovered and requires no pie plate.  This offers a more rustic looking dessert and makes the preparation process 'easier than pie'. On the other hand, pie has 2 crusts and is placed into a pie plate.

*Cooking apples are dense, crisp, and flavorful- Granny Smith, Honey Crisp, Gala


Variation: Replace one apple with ¼ cup fresh berries (blackberry, raspberry, or fresh cranberries…) to the mixture.

Don’t bake ahead: Once baking this dessert, you may let it sit up to four hours but I do not advise any longer. The texture of the crust will change over time and not result in the crisp flakey crust that is preferred.

Monday, January 16, 2012

Coconut White Chocolate Cookies....AND the difference between sugars

Why is it that in various cookie recipes both brown sugar and granular white sugar can be found in the ingredient list?!

Lately I have taken the initiative to solve this mystery for myself and therefore I dove into my cookbooks and picked up my spatula. 


First note to self, there are obvious color differences between the two sugars (of course!). The difference you ask? Granular white sugar is sugar cane placed through a granulator, then is  dried and processed into grains. Brown sugar goes through nearly the same process as white sugar but also molasses is added to it to formulate its dark characteristic. 

Next, after reading book after book and many cookie batch trials I found the following to be true:

By adding solely white sugar to the cookies, they will come out more crisp in texture and flat. If only using brown sugar or honey, the cookies will tend to absorb moisture in the baking process resulting in a more puffy cookie.

So it is all about preference therefore I break it down to you like this:

Use only white sugar for a cookie that is crisp and flat,
Use only brown sugar for a cookie that is puffy/fluffy (this does not mean chewy).
Use BOTH white and brown sugar for a cookie that is somewhat fluffy and  definitely chewy.
Coconut White Chocolate Cookies

Creaming the butter: Step 1 (notice it is still granular)

Creaming the Butter: Step 2 (it is now light and fluffy in texture)

The batter with all the ingredients incorporated

Form the dough into disks


Coconut White Chocolate Cookies
Author: Brenna Bowers
Serving: about 15-18 large cookies

Ingredients:
¾ cup butter
1 ½ cups white sugar*

1 egg
2 teaspoons vanilla extract

2 cups flour
1 2/3 cup flaked sweetened coconut
½ teaspoons cinnamon
½ teaspoons salt
1 teaspoons baking soda
1 cup white chocolate chips


Directions:
In a mixing bowl combine the butter and sugar. Beat for 2 minutes until light and fluffy. Stir in egg and vanilla.

In another bowl, combine all the dry ingredients except the white chocolate chips. Add to the creamed butter mixture and mix until well incorporated. Stir in the white chocolate chips.

Place onto an ungreased* *cookie sheet into a pre-heated oven at 350 degrees F.
Bake for 10-12 minutes.


When Brenna decides her cookies are ready:
I typically under bake my cookies. I claim they are ready when edges begin to harden and turn light golden brown. The center will still look slightly gooey but I remove them from the oven anyways and allow the cookies to cool before moving them from the cookie sheet.


*By using both brown and white sugar, it will result in a semi fluffy cookie with a chewy texture. Solely white sugar will result in cookies that are crisp and flat whereas only using brown sugar or honey will tend to absorb moisture in the baking process resulting in a puffy cookie. So this recipe is all about preference!

If you tend to like crisper, flat cookies, keep the recipe as is but if your prefer fluffier, chewy cookies, follow the substitution below.
1 ½ cups white sugar for ½ cup white sugar and ½ cup brown sugar


**Never grease your cookie sheet with oil. Cookies have enough butter in them to keep them from sticking. I prefer to place a Silpat on my cookie sheet to prevent any sticking or my secondary option is parchment paper.  If you are not equipped with either, place the cookie dough right onto the cookie sheet.

Wednesday, January 11, 2012

Homemade SWEET POTATO with SAGE Ravioli and THREE CHEESE Ravioli...

These homemade raviolis were quite the hit when I made them as gifts. This recipe can be putsy but the  hard work pays off when your first bite is taken! The flavors are bold and texture is creamy! So get the family together and make this a family meal that everyone has a part in!

Homemade Ravioli
Place 1 Tbs of the Sweet Potato mixture onto the center of the ravioli sheet.

Three Cheese Filling

Add caption

Seal the edges well with egg wash then press with fingers.

Sweet Potato with Sage and Three Cheese Ravioli

Sweet Potato and Sage Ravioli
Three Cheese Ravioli
Homemade
Author: Brenna Bowers
Serving: 100 fresh raviolis

Ingredients:
Sweet Potato and Sage Filling:
3 medium sweet potatoes
2 Tablespoons butter
1 sweet yellow onion, minced
1 Tablespoon white wine
1 Tablespoon white balsamic vinegar
3 fresh sage leaves, minced

Three Cheese Filling:
12 oz. ricotta cheese
1 cup freshly grated Parmesan
1 cup finely grated Mozzarella

Directions:
Sweet Potato and Sage Filling:
Rinse and dry the sweet potatoes. Prick with a fork all around the flesh. Place in a microwave safe bowl with a lid and microwave for 10 minutes. Turn each sweet potato and place back into the microwave for another 5-10 minute or until soft.  Let cool about 10-20 minutes and then peel off the skin with your fingers or a small knife. Smash the sweet potato until smooth with a fork or press it through a food mill or ricer.

In a medium skillet on low heat, add the butter and melt.  Stir in the diced onions and allow to cook until translucent in color (about 10 minutes). You do not want any browning so add the white wine and balsamic vinegar to continue the carmelization process but keep the onions from burning. Cook until the liquid evaporates. Stir into mashed sweet potato and add in sage leaves.

Three Cheese Filling:
Mix the three cheeses in a small mixing bowl until well combined.


Assembly:
Prepare pasta dough as the Semolina bag directs on the back of the packaging.

Place 1 Tablespoon of filling onto pasta. Brush with egg wash around the edges and press the second sheet of pasta on top; making sure to also press out all the air. Cut into a circle by pressing it with a shot glass or cut into a square shape. Press the edges well with your fingers!

Drop fresh pasta into rapidly boiling salt water. Cook for about 5 minutes  (about 2 more minutes after they begin to float in the water).

Toss with melted butter and freshly grated Parmesan cheese.

Wednesday, November 30, 2011

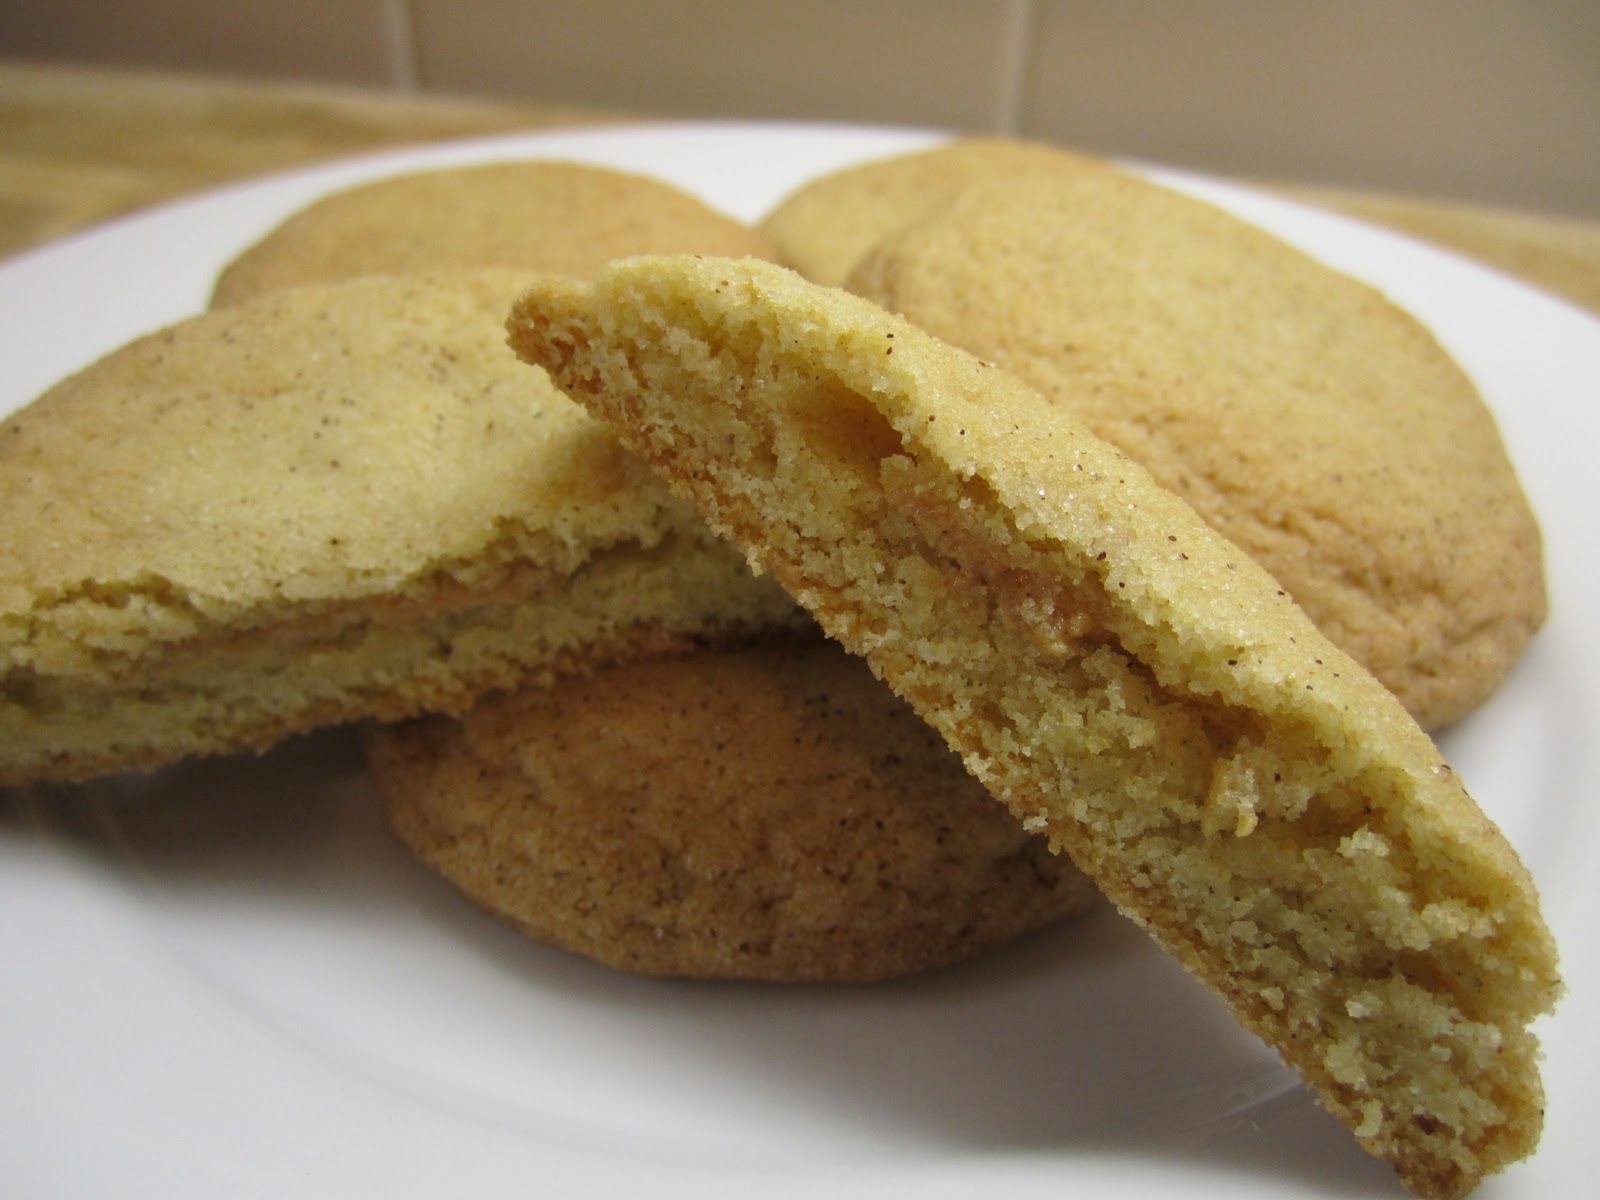
Snickerdoodles Hidden with Peanut Butter...

One of my families' holiday traditions is a Cookie Exchange. Friends are invited over to the house and show up with their favorite Christmas cookie recipe and ingredients. Everyone makes their batch of cookies together in the kitchen and then the cookies get baked off. When parting ways, everyone exchanges cookies leaving with a whole plate of various holiday cookies! This is a recipe would be perfect for a time like this!

Peanut Butter is hidden in the center!!!!

Cream this mixture: to whip air into the batter

Notice it is fluffy and light in color. Well "creamed'

Dry ingredients

The snickerdoodle dough

Flatten the dough balls into the 1/4" disks.

Spoon a small dollop of peanut butter on each disk of dough.

Place another disk on top of the peanut butter and press the edges well!

Roll in Cinnamon-Sugar mixture.

Perfectly baked to light golden color.


Snickerdoodles Hidden with Peanut Butter
Author: Brenna Bowers
Serving: 24 cookies


Ingredients:
1 cup butter, room temperature
1 ½ cup white sugar
2 eggs
½ teaspoon vanilla extract
2 ¾ cup all purpose flour
2 teaspoons cream of tartar*
1 teaspoon baking soda
¼ teaspoon salt
½ teaspoon cinnamon
¼ teaspoon nutmeg

Filling:
¼ cup creamy peanut butter

Cinnamon-sugar Mixture:
3 Tablespoons sugar
3 teaspoons cinnamon


Directions:
Cream (Tip 1) butter, sugar and eggs until light and fluffy. Stir in vanilla. Add flour, cream of tartar, baking soda, salt, cinnamon and nutmeg; mix until just combined. Place plastic wrap over the dough and chill for 1 hour (Tip 2).

Roll 1½ teaspoon size dough balls in your palms and then flatten into a disk (about ¼” thick). Add a ½ teaspoon of peanut butter in the center. Roll and flatten another disk of dough to place on top of the dough with the peanut butter. Purse the edges of the dough well to trap the peanut butter into the middle. Roll into the cinnamon-sugar mixture to coat the outside. Place onto an ungreased cookie sheet.

Bake at 350 degrees (F) for 9 minutes.


Tip 1: To “cream” means to whip the batter with hand beaters or a whisk by hand until the batter becomes lighter in color and fluffy. This is a process of incorporating air into your batter.

Tip 2: It is important that you chill the batter if you want your cookies to end up chewy and fluffy. It is important that the butter is firm before you put the cookies into the oven for baking. This will keep the structure of the cookie as it bakes and the end result will be a deliciously fluffy yet chewy cookie.

*Cream of Tartar: There is not a good substitute for this product. Do not even try substituting with baking powder or baking soda. I tried and the cookies ended up with a crumbly texture and far from chewy and soft like I prefer.

Wednesday, November 23, 2011

Pumpkin Scones with White Chocolate Cinnamon Glaze...

Snuggle by the fire, heat up some coffee or cocoa and enjoy a healthy version of a sweet Fall treat!

This recipe has less sugar and fat that most scones so you can can keep off the pounds this holiday season.
Pumpkin Scone with White Chocolate Cinnamon Glaze


Place dry mixture into Kitchen Aid.
Add chilled butter chunks.
Can mash with the back of a fork instead.

Mix until it resembles a course meal.

Combine wet ingredients.

Stir wet ingredients.

Fold the wet ingredients into the dry.

Mix only until the mixture comes together in a dough ball.

Pat with your hands into a circle, using as little flour as possible.

Cut into evenly sized triangles.

Bake until they puff and slightly crack on the top.

Moist and yet still fluffy.

White Chocolate Cinnamon Glaze

Drizzle glaze over each scone and let it run down the sides.

Enjoy!


Pumpkin Scones with White Chocolate Cinnamon Glaze
Author: Brenna Bowers
Serving: 8-10


Ingredients:
1 cups all-purpose flour
1 cup whole wheat flour
1/4 cup sugar
1 Tablespoon baking powder
½ teaspoon baking soda
1/4 teaspoon salt
1 teaspoon ground cinnamon
1/4 teaspoon ground nutmeg
1/4 teaspoon ground cloves
1/8 teaspoon ground ginger
6 tablespoons cold butter, cut into 1-inch cubes
4 tablespoons honey
1/2 cup canned pumpkin puree
3 Tablespoons half-and-half
1 teaspoon vanilla extract
1 large egg

Glaze:
¼ cup white chocolate chips
¼ teaspoon vanilla extract
¼ teaspoon cinnamon
3 Tablespoons milk


Directions:
Preheat the oven to 425 degrees (F). Line a baking sheet with a Silpat or parchment paper.

In a kitchen aid bowl, add both flours, sugar, baking powder, baking soda, salt, cinnamon, nutmeg, cloves and ginger. Place the chilled butter chucks into the dry mixture and mix until it resembles a coarse meal and the butter pieces are the size of corn kernels.

In a small bowl, combine all the wet ingredients and pour into the dry mixture. Fold, stirring as little as possible just until the dough comes together.

Place the dough onto the counter and form it into a 7 inch circle (about ¼ inch thick) by patting it with your hands (use a small amount of flour if the dough is sticking to your hands or the counter).  Cut into 8 to 10 triangles and place on prepared baking sheet, leaving a ½ inch gap for the scones to rise as they bake.  Bake for 12-14 minutes and then remove from the oven and allow to cool.

Glaze:
In a small bowl, melt the white chocolate chips (in 30 second increments to prevent burning). Stir in the vanilla, cinnamon and milk.  Drizzle with a spoon over each scone and allow to dry before serving or storing in an airtight container.

Prepare in advance: Can be made 2-3 days in advance and either stored air tight in