Wednesday, November 30, 2011

Snickerdoodles Hidden with Peanut Butter...

One of my families' holiday traditions is a Cookie Exchange. Friends are invited over to the house and show up with their favorite Christmas cookie recipe and ingredients. Everyone makes their batch of cookies together in the kitchen and then the cookies get baked off. When parting ways, everyone exchanges cookies leaving with a whole plate of various holiday cookies! This is a recipe would be perfect for a time like this!

Peanut Butter is hidden in the center!!!!

Cream this mixture: to whip air into the batter

Notice it is fluffy and light in color. Well "creamed'

Dry ingredients

The snickerdoodle dough

Flatten the dough balls into the 1/4" disks.

Spoon a small dollop of peanut butter on each disk of dough.

Place another disk on top of the peanut butter and press the edges well!

Roll in Cinnamon-Sugar mixture.

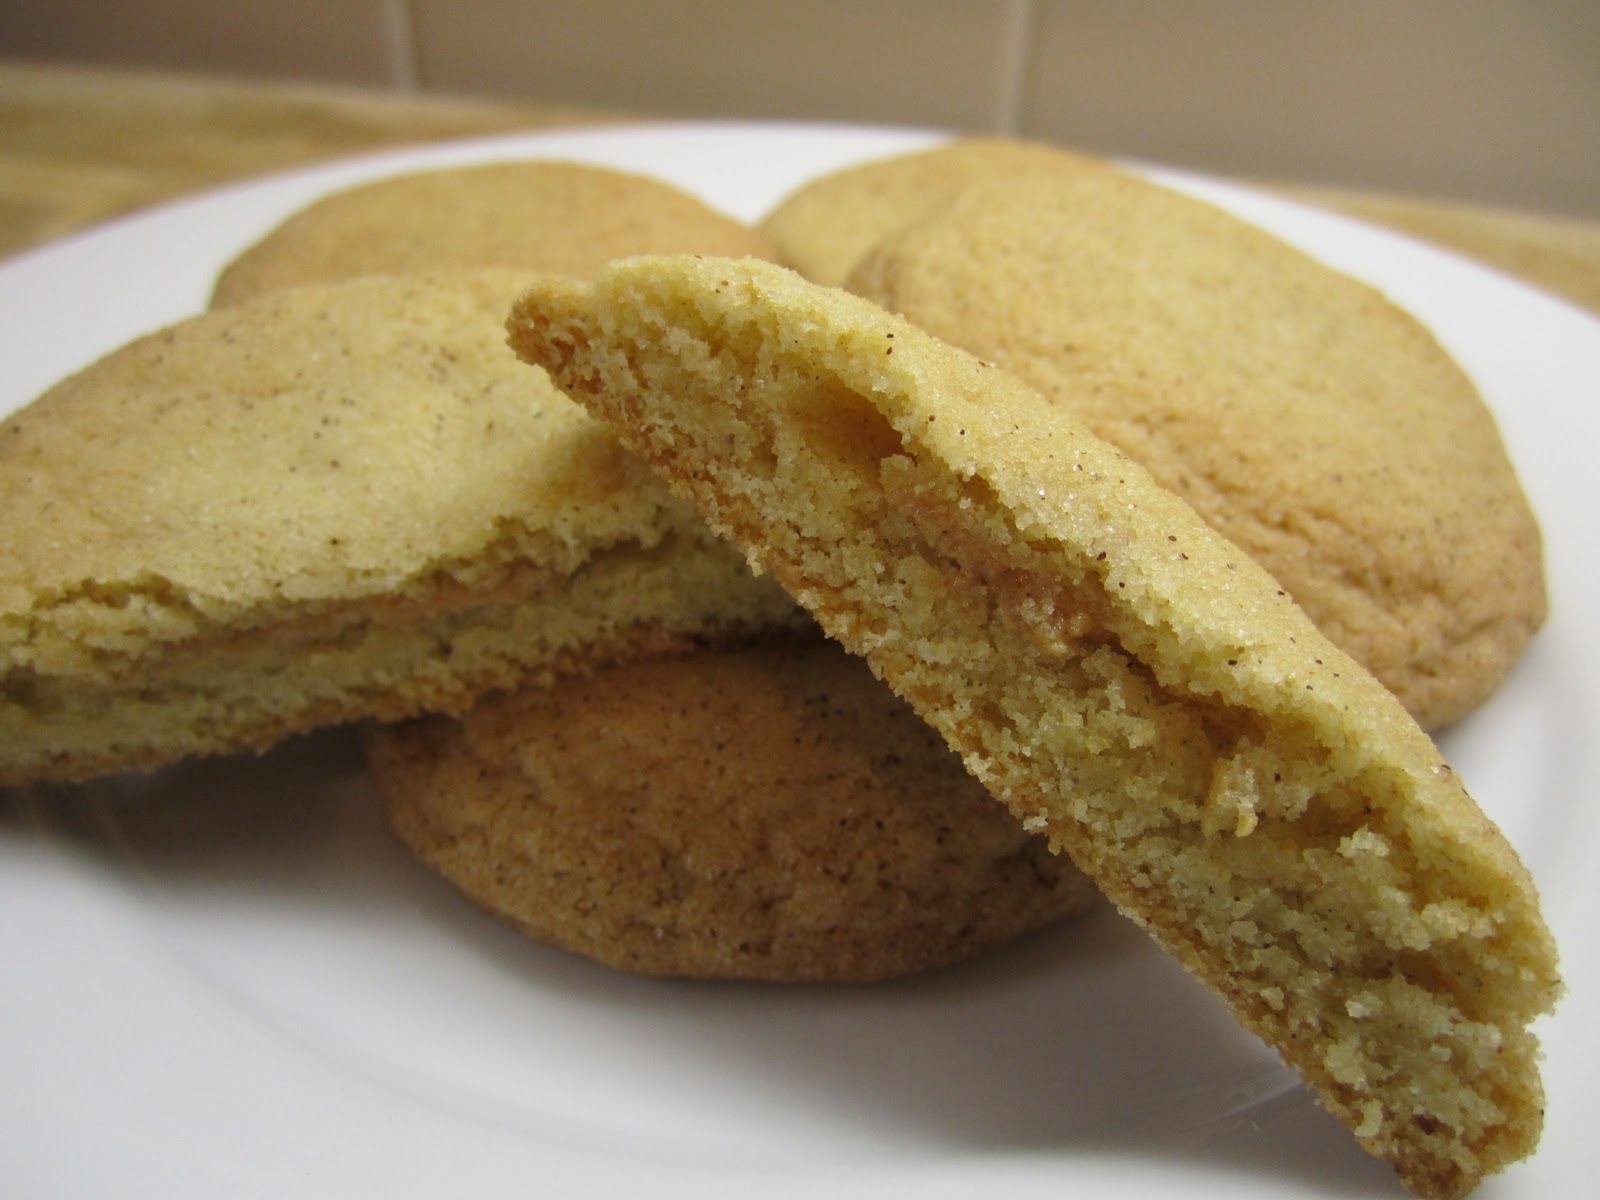
Perfectly baked to light golden color.


Snickerdoodles Hidden with Peanut Butter
Author: Brenna Bowers
Serving: 24 cookies


Ingredients:
1 cup butter, room temperature
1 ½ cup white sugar
2 eggs
½ teaspoon vanilla extract
2 ¾ cup all purpose flour
2 teaspoons cream of tartar*
1 teaspoon baking soda
¼ teaspoon salt
½ teaspoon cinnamon
¼ teaspoon nutmeg

Filling:
¼ cup creamy peanut butter

Cinnamon-sugar Mixture:
3 Tablespoons sugar
3 teaspoons cinnamon


Directions:
Cream (Tip 1) butter, sugar and eggs until light and fluffy. Stir in vanilla. Add flour, cream of tartar, baking soda, salt, cinnamon and nutmeg; mix until just combined. Place plastic wrap over the dough and chill for 1 hour (Tip 2).

Roll 1½ teaspoon size dough balls in your palms and then flatten into a disk (about ¼” thick). Add a ½ teaspoon of peanut butter in the center. Roll and flatten another disk of dough to place on top of the dough with the peanut butter. Purse the edges of the dough well to trap the peanut butter into the middle. Roll into the cinnamon-sugar mixture to coat the outside. Place onto an ungreased cookie sheet.

Bake at 350 degrees (F) for 9 minutes.


Tip 1: To “cream” means to whip the batter with hand beaters or a whisk by hand until the batter becomes lighter in color and fluffy. This is a process of incorporating air into your batter.

Tip 2: It is important that you chill the batter if you want your cookies to end up chewy and fluffy. It is important that the butter is firm before you put the cookies into the oven for baking. This will keep the structure of the cookie as it bakes and the end result will be a deliciously fluffy yet chewy cookie.

*Cream of Tartar: There is not a good substitute for this product. Do not even try substituting with baking powder or baking soda. I tried and the cookies ended up with a crumbly texture and far from chewy and soft like I prefer.

Wednesday, November 23, 2011

Pumpkin Scones with White Chocolate Cinnamon Glaze...

Snuggle by the fire, heat up some coffee or cocoa and enjoy a healthy version of a sweet Fall treat!

This recipe has less sugar and fat that most scones so you can can keep off the pounds this holiday season.
Pumpkin Scone with White Chocolate Cinnamon Glaze


Place dry mixture into Kitchen Aid.
Add chilled butter chunks.
Can mash with the back of a fork instead.

Mix until it resembles a course meal.

Combine wet ingredients.

Stir wet ingredients.

Fold the wet ingredients into the dry.

Mix only until the mixture comes together in a dough ball.

Pat with your hands into a circle, using as little flour as possible.

Cut into evenly sized triangles.

Bake until they puff and slightly crack on the top.

Moist and yet still fluffy.

White Chocolate Cinnamon Glaze

Drizzle glaze over each scone and let it run down the sides.

Enjoy!


Pumpkin Scones with White Chocolate Cinnamon Glaze
Author: Brenna Bowers
Serving: 8-10


Ingredients:
1 cups all-purpose flour
1 cup whole wheat flour
1/4 cup sugar
1 Tablespoon baking powder
½ teaspoon baking soda
1/4 teaspoon salt
1 teaspoon ground cinnamon
1/4 teaspoon ground nutmeg
1/4 teaspoon ground cloves
1/8 teaspoon ground ginger
6 tablespoons cold butter, cut into 1-inch cubes
4 tablespoons honey
1/2 cup canned pumpkin puree
3 Tablespoons half-and-half
1 teaspoon vanilla extract
1 large egg

Glaze:
¼ cup white chocolate chips
¼ teaspoon vanilla extract
¼ teaspoon cinnamon
3 Tablespoons milk


Directions:
Preheat the oven to 425 degrees (F). Line a baking sheet with a Silpat or parchment paper.

In a kitchen aid bowl, add both flours, sugar, baking powder, baking soda, salt, cinnamon, nutmeg, cloves and ginger. Place the chilled butter chucks into the dry mixture and mix until it resembles a coarse meal and the butter pieces are the size of corn kernels.

In a small bowl, combine all the wet ingredients and pour into the dry mixture. Fold, stirring as little as possible just until the dough comes together.

Place the dough onto the counter and form it into a 7 inch circle (about ¼ inch thick) by patting it with your hands (use a small amount of flour if the dough is sticking to your hands or the counter).  Cut into 8 to 10 triangles and place on prepared baking sheet, leaving a ½ inch gap for the scones to rise as they bake.  Bake for 12-14 minutes and then remove from the oven and allow to cool.

Glaze:
In a small bowl, melt the white chocolate chips (in 30 second increments to prevent burning). Stir in the vanilla, cinnamon and milk.  Drizzle with a spoon over each scone and allow to dry before serving or storing in an airtight container.

Prepare in advance: Can be made 2-3 days in advance and either stored air tight in

Saturday, November 19, 2011

Pumpkin Apple Pecan "Easy as Pie"...

This is a pie that has a homemade touch and is SO EASY, delicious as well as foolproof. I created this recipe because I am always stuck with the predicament at Thanksgiving time....Apple or Pumpkin Pie?? Well this is the perfect combination of the two flavors and will be your families new favorite.

This recipe is dedicated to Marcia Ramsland and Sam's Club. I could not do the Holiday seasons without them!


Cut off excess crust with a small knife.

Press the edges with your fingers to flute the crust.


Re-roll excess pie crust, cut in leaf shapes


Pumpkin Apple Pecan “Easy as Pie”
Author: Brenna Bowers
Serving: one 9” pie

A delicious pie that is so very easy to make and still has a homemade touch.


Ingredients:
1 premade pie crust
(roll out kind rather than the kind that is already in the pie plate)
(Trader Joe’s has a great one!)
30 ounce can Libby's® 100% Pure Pumpkin Pie Mix
2 eggs
5 ounce can Carnation® Evaporated Milk
21 ounce can White House® York Imperial Sliced Apples (or apple pie filling)
1/2 cup Planters® Deluxe Mixed Nuts (roasted), finely chopped

Directions:
Preheat the oven to 425 degrees (F.).

Place the pie dough in the bottom of a 9” pie plate. Cut off the scraps that hang over the edge with a small knife. Press the edges between your fingers to make a pattern in the crust. Set the prepared pie shell aside. Re-roll the extra dough and with a small knife cut into leaf shapes. Place on a baking sheet lined with tin foil. Bake the pie crust leafs for 10 minutes or until golden brown, set aside.

In a large bowl, combine canned pumpkin pie mix, eggs and evaporated milk. Stir until well incorporated. Pour in apple slices and roasted mixed nuts and stir until just combined.

Pour the filling mixture into prepared pie shell. Spread mixture smooth for even baking.

Bake at 425 degrees (F.) for 15 minutes. Then reduce baking time to 350 degrees (F.) for 40-50 minutes. The pie is ready when it does not juggle when gently shaken and the crust is golden brown. Once the pie has been baked fully and pulled from the oven, as it is still hot, place the pie crust leaves on top in pattern.

Allow the pie to cool 20-30 minutes for easier slicing.

Serve cold or slightly warmed.


Brenna’s favorite additions to the pie:
Vanilla ice cream
Carmel sauce
Whipped cream


*Store in the fridge, well covered for up to 3 days. Re-heat in a 350 degree (F.) oven for 20 minutes before serving.


Monday, November 14, 2011

Thanksgiving Day Finger Sandwiches...

Lately, I have had the privileged of working alongside The Organizing Pro--Marcian Ramsland ! Visit her website at organizingpro.com and get some tips as to how she can help you "Simplify Your Life and the Season"!!!!


Currently she is featured at Sam's Club as their Holiday Food and Entertaining Program Spokes Person.   I have gotten the opportunity to come alongside her to create recipes that use Sam's Club ingredients so take a look at what is in store!


Thanksgiving Day Finger Sandwiches
Author: Brenna Bowers
Serving: 16 mini appetizer sandwiches

The perfect appetizer for a Thanksgiving Holiday party-it’s the traditional turkey meal all-in-one!
This is just the dish to have the day after Thanking to re-use your leftovers!


Ingredients:

2 packages Artisan Fresh™ Ciabatta Rolls (8 ct.)
10-14 oz. Burgers' Smokehouse Smoked Turkey OR Burgers' Smokehouse City Ham*; sliced
1 ½ cups Stove Top Stuffing
1 cup Idahoan Real Mashed Potatoes
½ cup Artisan Fresh™ Cranberry-Orange Relish

Directions:
Preparation:
With a bread knife, cut each Cibatta Roll in half, to become an open-face sandwich.
Following the directions on the box, prepare the Stove Top Stuffing (bring water and butter to a boil, add stuffing, cover and let set). Also, as instructed by the manufacturer’s directions, prepare the Idahoan Real Mashed Potatoes (just add water and heat).
Slice the Burgers' Smokehouse Smoked Turkey OR Burgers' Smokehouse City Ham into ¼ inch slices and set on a plate. Heat in microwave for 2 minutes (or until hot).

Assembly:
To assemble each sandwich spread 1 ½ teaspoons of cranberry relish on the bottom bun and 1 Tablespoon of mashed potatoes on the top bun. Build onto the sandwich with 1 ½ Tablespoons of stuffing and 2-3 slices of turkey/ham. Carefully combine the bottom and top buns to create your Thanksgiving sandwich. Slice in half or thirds and place on a serving platter.


Leftovers: This recipe is very versatile. Add any or all of your Thanksgiving day leftovers into this sandwich! You will be so happy to enjoy Thanksgiving without the hassle of preparation the day after!


*If you prefer to not purchase an entire Burgers' Smokehouse Smoked Turkey OR Burgers' Smokehouse City Ham you can opt to purchase Tyson® Premium Ham
or Oscar Mayer® Oven Roasted Turkey Breast

Thursday, November 10, 2011

Re-Stuffed Spaghetti Squash with Turkey Meatballs...

Beautiful presentation and easy clean up....what more could you want?! Simply serve the Spaghetti Squash right in it's own shell. This can even be made ahead of time and baked right before serving for the ultimate convenience for holiday meals!

Re-Stuffed Spaghetti Squash with Turkey Meatballs


Spaghetti Squash

Poke tip of knife into center, use rocking motion. BE CAREFUL!

Remove insides

With a spoon discard the seeds.

Place face-down on a baking  sheet with a lip.

Ok if the outside gets roasted. Make sure you just don't dry out the flesh inside.

Scrape the flesh with a fork to make spaghetti strings (already baked).

Just like spaghetti!

After scraping out all the insides, save the shell of the squash for re-stuffing.

Meatball ingredients

Roll  mixture in your hands to create meatball.


Saute in oil at medium heat.

Brown all the edges of the meatballs.


Ingredients for re-stuffing.


Saute onions in the same pan/oil as the meatballs. Saute a few minutes

Add tomatoes, continue to saute until  tomatoes wilt and release their juices.


Place all the ingredients into the spaghetti squash strings.

Time to re-stuff the Spaghetti Squash shells.

Sprinkle with more cheese and boil until the cheese melts/browns


Re-Stuffed Spaghetti Squash with Turkey Meatballs
Author: Brenna Bowers
Serving: 4
Ingredients:
1 large spaghetti squash
1 pound ground turkey
5 gloves garlic (divided), minced
1 small white onion (divided), diced
Salt and Pepper
2 cups cherry tomatoes, cut in half
5 Tablespoons grapeseed oil *
1 ½ teaspoons Italian Herbs
5 gloves garlic (divided), minced
4 oz. Feta cheese
4 oz. Shredded Mozzarella
pinch red pepper flakes ( if you like spicy)


Directions:
Preheat the oven to 375 degrees (F).

Split the Spaghetti squash open with a very sharp knife digging the point of the knife into the center of the squash and with a rocking motion, carefully open up the squash.  Place on a cookie sheet with a lip or a 13x9 inch baking dish (lined with tin foil) face down (Tip 1). Bake for 50-60 minutes. You know it is cooked when you can take a fork and scrape the squash into “spaghetti strings”. Once the squash has been fully shredded into strings and all of the insides placed into a large bowl; save the outer portion of the squash for re-stuffing later.

In a medium bowl, combine ground turkey, 2 cloves of minced garlic, ¼ cup diced white onion and a dash of both salt and pepper. Mix well and then with your hands form the mixture into 1” meatballs.

Heat up a large skillet to medium heat. Add 3 Tablespoons grapeseed oil. Once the oil is hot, add the meatballs. Cook all of the meatballs, turning every 3 minutes or so to allow them to brown and cook on all sides. After about 10 minutes of slow cooking the meatballs, check to see if they are no longer pink in the middle. If so, they are ready to be placed into the bowl with the prepared spaghetti squash.

With the same pan used to cook the meatballs, add the rest of the oil (2 Tablespoons) and sauté the onions for 3 minutes. Add the cherry tomatoes and cook another 6-7 minutes. Add garlic, herbs and red pepper flakes continuing to cook the mixture until the tomatoes begin to slightly break down and release their juices.

Add the tomato mixture, Feta and Mozzarella to the spaghetti squash and meatball mixture. Toss well and then place all of the mixture back into the spaghetti squash shell.

Turn the oven to broil and place the re-stuffed spaghetti squash into the oven for 5 minutes or until the top/cheese begins to brown.

Remove from the oven and serve hot!


Tip 1: I have tested to see the best results in the texture and flavor of cooking the spaghetti squash. I prefer baking the squash face-down (as opposed to face-up) for it does not over brown the flesh (causing dryness) yet instead it basks in it’s own stem to make for easier shredding.

*Grapeseed Oil: I prefer to use Grapeseed oil in this recipe because it can withstand higher temperatures than olive oil and will prevent the oil from smoking if the pan gets too hot. Olive oil or canola oil can be substituted and used if you prefer.

Make ahead: Prepare recipe as directed above up through re-stuffing the squash. Sprinkle with cheese and then cover with foil and store in an airtight container. Freeze (up to 1 month) or refrigerate (up to 3 days). To serve hot, remove from freezer (let thaw for 1 day in the fridge) or fridge. Place into a 350 degree (F) oven (with foil still on) and bake for 20-30 minutes (or until hot in the center). Remove the foil and broil for 5 minutes