Wednesday, August 10, 2011

Margarita Lime Cupcakes...

The sunshine has recently sparks my appetite for a refreshing and tangy dessert. With this in mind, I was inspired to make something sweet for a Neighborhood Fiesta Block Party and came up with this very special mini cupcake that was quite a hit! This dessert  is the perfect union of a summery Margarita and a sweet cupcake. Go ahead, bake this masterpiece.

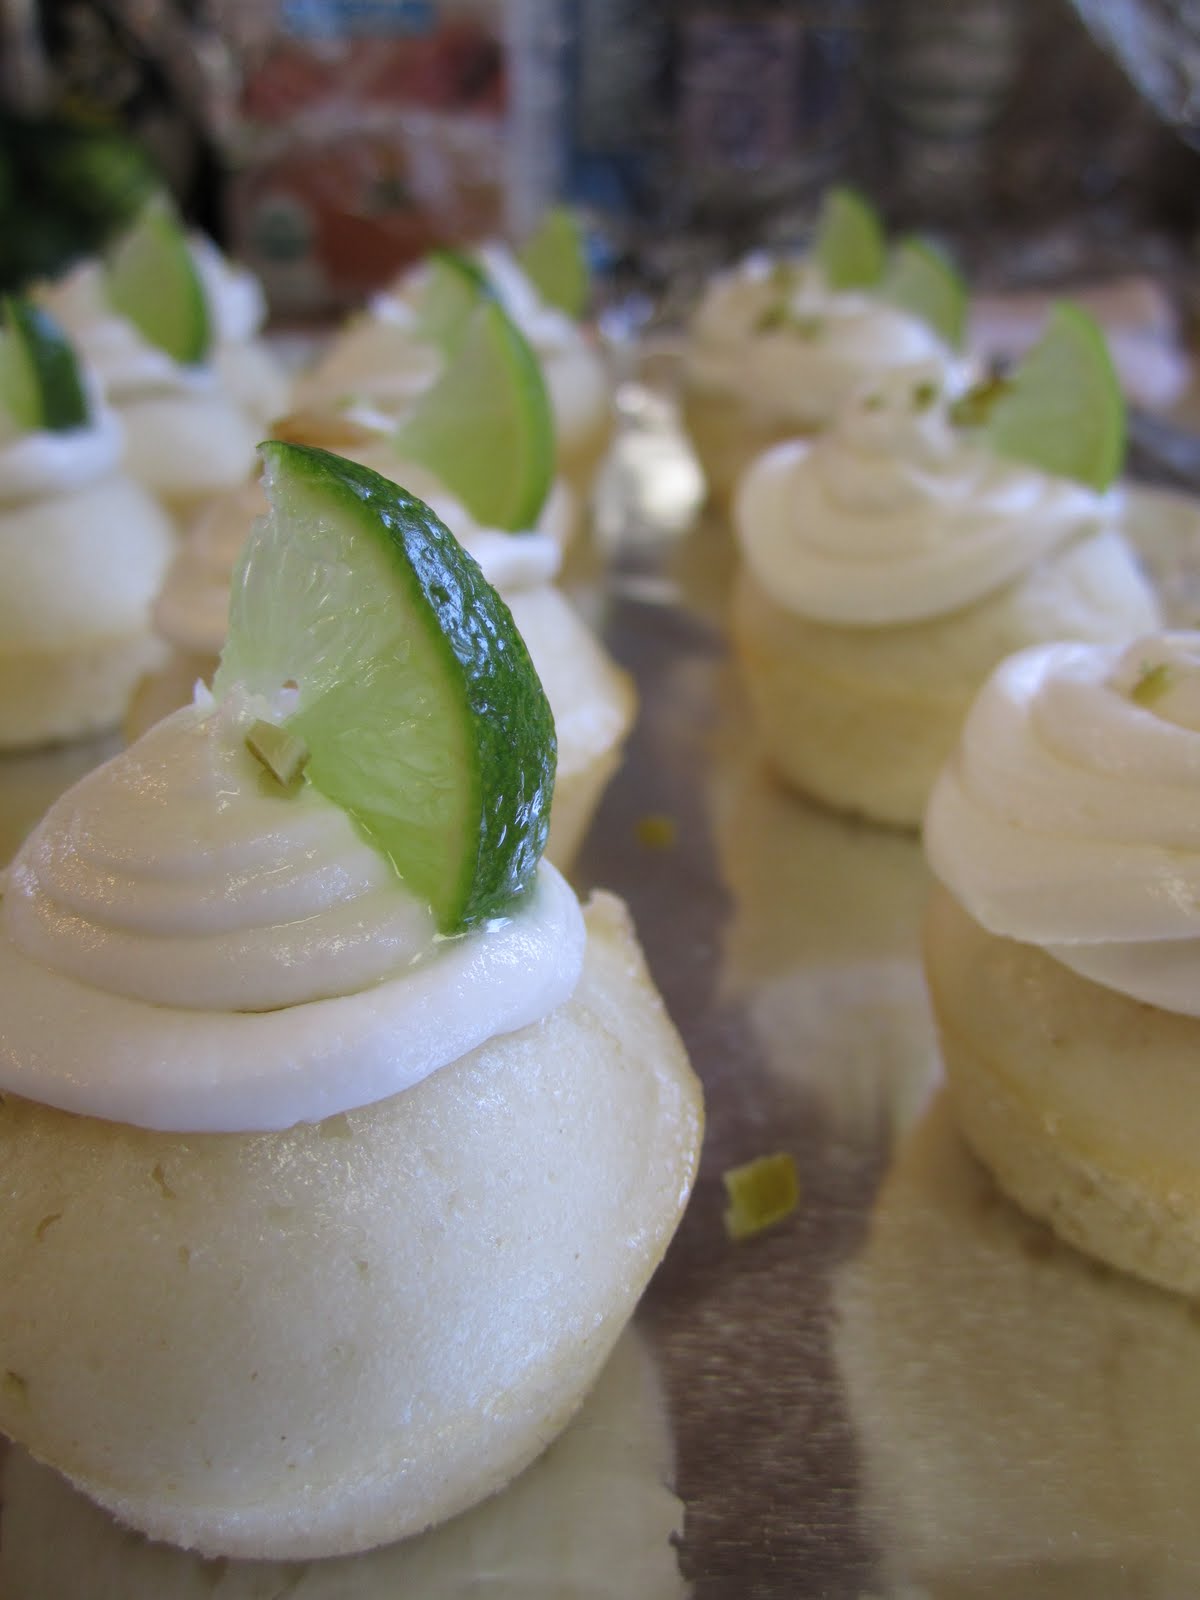
Brenna's Mini Margarita Lime Cupcakes!

One bite of perfection!

The Cupcake batter, notice the specks of lime zest.

Fill the pan 3/4 full with batter, bake until toothpick comes out clean.

Pull from the oven before they brown, you do not want to dry them out.

Place on a cookie sheet with foil to cool before the next special step...

Secret ingredient: a brushing of Tequila and Coconut Rum (for added moistness)

Perfect crumb, very moist and flavorful!

Key Limes. Packed full of flavor and tang.

Cream cheese Butter cream Frosting with Tequila and Coconut Rum


Margarita Lime Cupcake
Author: Brenna Bowers
Makes: 48 mini cupcakes
Ingredients:
Cake:
1 box White Cake Mix
½ cup flour
3 egg whites
1 can Frozen Bacardi Margarita Mix, thawed to room temperature (found in the frozen section at grocery stores near the other juice concentrates)
2 Tablespoons oil
1 Tablespoons lime juice (I used Key limes but any lime will work)
1 Tablespoon Coconut Rum
2 Tablespoons Tequila

Simple Syrup:
1 Tablespoon Coconut Rum
1 Tablespoon Tequila

Frosting:
4 ounces cream cheese
½ cup butter (1 stick)
1 box powdered sugar
1 Tablespoon lime juice
1 Tablespoon Coconut Rum
1 Tablespoon Tequila

2 Key Limes*

Garnish:
Key Limes, sliced in small wedges

Directions:
Preheat the oven to 375 degrees F.
In a large bowl, combine all the cake ingredients and stir on medium speed for 30 seconds. Spray a mini cupcake tin with oil spray (OR grease it lightly with butter and dust with flour). Fill each cupcake holder only three-quarters of the way full. Bake for 8 minutes (or until an inserted toothpick comes out clean).

Allow the cupcakes to cool fully.
In a very small bowl combine the 1 Tablespoon of Coconut Rum and 1 Tablespoon Tequila. Using a pastry brush, brush a little of the mixture onto each cooled cupcake (this will add another element of flavor and also moisten the cupcake more).

To prepare the frosting, place the cream cheese and butter in the mixer and whip on high for 1 minute. Add the powdered sugar and beat for another minute until light and fluffy. Add in the lime juice, Coconut Rum and Tequila and mix just until combined.

Place the frosting in a piping bag and pipe in a circular potion onto each mini cupcake. Garnish the cupcakes with sliced wedges of the Key Limes.


*Key Limes are a smaller breed of limes that have a thin rind and have a more tart and bitter flavor then other limes.

Tuesday, August 2, 2011

Artichoke Wonton Lasagna Cups...

Thanks to Leah Gowin's cupboard, I was inspired to create a new recipe today. When I opened up her pantry to see what could be created for dinner I was faced with ingredients such as jarred artichokes, wonton wrappers and Alfredo sauce. This was just what I needed in addition to the mozzarella and ricotta in the fridge to create Artichoke Wonton Lasagna Cups. This recipe even turned out to be a healthy alternative to regular lasagna. By using the wonton wrappers instead of lasagna noodles, I reduced the amount of carbs and also cut out some of prep work. No go to your cupboard and see what YOU can make!

Artichoke Wonton Lasagna Cups
 
Mini Artichoke Wonton Lasagna Cups
Author: Brenna Bowers
Makes: 4 servings


Ingredients:
1 jar seasoned artichoke hearts, drained, chopped roughly
1 cup Ragu Light Parmesan Alfredo
1/2 cup light ricotta cheese
1 egg, beaten
2 tsp Italian seasoning
12 wonton wrappers
2 cups shredded mozzarella cheese
½ cup shaved Parmesan cheese

Directions:
Preheat the oven to 350 degrees F. Spray a muffin pan with oil spray.

In a small bowl, combine and stir the Alfredo sauce, artichoke, ricotta, egg, and Italian seasoning.

In each muffin cup, place 1 (or overlap 2 if needed so that the whole cup is lined with a wonton wrapper) wonton wrapper and press it lightly against the edges of the muffin tin. Spoon 1 large Tablespoon of the artichoke mixture into the cup and add a pinch of the mozzarella and Parmesan. Starting again with a wonton wrapper, repeat this process resulting in 2 layers for each muffin cup (always ending with the mozzarella).

Bake for 15 minutes or until the cheese is melted and starts to brown.

Monday, July 18, 2011

Cedar Plank Salmon Gone Sweet and Spicy...

Try something new today! Grill your fish on a Cedar Plank and have some of the best tasting fish of your life! Grilling on these planks make for easy cooking with wonderful flavor packed into each bite. The plank acts as a buffer from the heat of the grill and allows you to cook your fish low and slow while also letting the smoke of the Cedar wood seep into the flesh of the fish. No flipping is necessary, no loosing half your fish through the grill slats and no flame to your fish resulting in chard edges because of loss juices! It will change the way your grill!
Salmon Grilled and Seasoned to PERFECTION!

Notice the Cedar Plank the salmon filet is resting on

Please note, the recipe was quadrupled to make this much


So thanks to another UCSD Medical Center cooking course, I learned to make this recipe and now I am happy to share it with YOU so YOU  can enjoy!


Cedar Plank Salmon Gone Sweet and Spicy (UCSD Medical Center)
Author: UCSD Medical Center; Healing Foods Class; adapted and written by Brenna Bowers
Makes: about 5-6 servings (4 oz. each)

Ingredients:
4 Tablespoons brown mustard
2 Tablespoons honey
3 Tablespoons brown sugar
2 teaspoons cumin
1 teaspoon coriander
½ teaspoon salt
½ teaspoon chili powder
½ teaspoon cayenne pepper
½ teaspoon pepper
1 orange, zested (Tip 1)
1 lemon, zested
1.5 pound salmon filet with skin on* 1 cedar plank (can be purchased online: http://www.cedarplank.com/) (Tip 2)
Olive oil for brushing the cedar plank

Directions:
Place the cedar plank in a bucket of water and fully immerse for 4 hours. This will keep your plank from burning when it is on the grill.

To Marinade:
Marinade the salmon by placing the salmon fillet skin-side-down in a glass dish. Brush on the mustard and honey with the back of a spoon. Then place all the ingredients (from the brown sugar to the lemon zest) into a small bowl and stir. Sprinkle this on the salmon filet and pat it into the fish to adhere. Cover it with plastic wrap and place it in the fridge for 2-6 hours.

To Grill:
Preheat the grill to medium high heat and allow it to heat up fully; about 10 minutes. Place the cedar plank on the grill and brush it with olive oil (to keep the fish from sticking). Allow the plank to get hot, about 3-5 minutes then push it to the indirect heat (where the fire is not directly on the wood). Lay the salmon on top of the plank and close the lid of the grill. Allow this fish to cook about 15-20 minutes or until it begins to flake when you place a fork in it and pull apart the meat. Remove from the grill and let the fish sit about 10 minutes before you serve it (this will help lock the juices into the fish). ENJOY!


Tip 1:  To properly “Zest” citrus, grate (with a “zester” works best or the very finest part of your grater) the outside skin of the fruit. You only want the colored part to be zested, not the white flesh underneath because the white section is quite bitter. 

Tip 2: Cedar Planks: This is just what it sounds like, a ¼ inch piece of Cedar wood that is used as a cooking device over the grill. The wood needs to be soaked in water so that it does not burn. Place your fish right on top of the board on the preheated grill and it will cook the fish slowly while infusing the flavors of the wood and keep the fish from falling through the grill slats. You are left with a beautiful piece of fish that is so moist and delicious! By the way, you can use the planks a couple of times, just wash them off with hot water and use until it begins to fall apart.

* Best if you purchase “wild” caught salmon rather than “farm raised” salmon

Friday, July 15, 2011

Chicken on a Bed of Rosemary Branches...

After having attended yet another wonderful class at the  University of California San Diego Medical Center Healing Foods Kitchen I have walked away with more health conscious recipes that are full of flavor and will bring flavor to each bite you take!

This class was special today because it was held at the International Community Foundation Organic Gardens. We were toured through the beautiful gardens where they grow organic foods to promote healthy eating and nutrition, with an emphasis on diabetes and obesity prevention among under-served communities in San Diego’s South Bay.

Amongst one of my favorite recipes of the day was the grilled whole chicken on a thick bed of rosemary (and I mean thick....almost like we placed the whole bush on the grill!). It gave such a rich flavor to the chicken and locked in the tenderness and juices resulting in an outstanding chicken dish!


Chicken on a Bed of Rosemary Branches
Author: UCSD Medical Center, Healing Foods Kitchen, written by Brenna Bowers
Makes: 1 whole chicken

Ingredients:
1 (3 pound) Whole chicken, thawed
2 Tbs olive oil
¼ cup fresh lemon juice
6 cloves garlic, minced
1 large bunch of rosemary (enough to place the whole chicken on a thick bed of rosemary so that it will not touch the grill slats, you may want just part of a whole bush- no joke!)
Salt and Pepper

2 large bricks or rocks, wrapped in foil (Tip 1)

Directions:
To Do Ahead of Time:
·         Butterfly open the chicken and take off the skin using a pair of kitchen scissors. Place the chicken in a Ziploc bag with the oil, lemon juice, garlic, salt and pepper to taste and allow it to marinade for at least one hour or up to 4 hours.
·         Soak the rosemary branches/bush in water for 30-60 minutes; this will keep your rosemary from burning when it is placed on the hot grill.
·         Heat the grill to medium high heat and place the bricks/rocks wrapped in foil on the grill to get them hot.
Grilling:
Turn the grill to medium heat. You do not want to see a flame. Shake off the excess water from the rosemary bush and place it on the grill in the indirect heat (this should be a thick layer of rosemary, so thick you do not see the grill slats any more) (Tip 1). Place the chicken on top of the bed of rosemary, breast side down and place the 2 hot bricks on top of the chicken. Close the lid of the grill and cook the chicken for 8-10 minutes. Open the grill, flip the bird and replace the hot bricks on top. Continue cooking until your meat thermometer reads 160 degrees F.

Let the chicken rest 10 minutes off the grill and then carve* the bird. This will lock in the flavorful juices of the chicken!


Tip 1: The large bricks/rocks wrapped in foil will act as a heat source when cooking the chicken. Ahead of time you must put the bricks on the grill and allow them to get nice and hot. They will be placed on top of the chicken as it is cooking and give the chicken a heat source from above. Secondly, the pressure from the bricks/rocks will press the chicken into the rosemary for added flavor.

 *Carve is a fancy word for slicing up the bird into pieces/portions.

Saturday, July 2, 2011

Chilled Mango Ginger Curry Soup with Shrimp...

Yes, I know it is still summer but that does not mean you can't make some soup! But this is not just any soup, it's chilled soup with delicious flavor!!!!


Coconut water is what makes this recipe extra special. Zico Coconut Water is a "product that has been revered as a natural source of nutrition, wellness, beauty and hydration". Coconut water is the clear liquid found in a coconut...if you are able to bust it open.

If you have never tried a fresh coconut before, now is the time. You can find them at stores such as Whole Foods. Good luck opening it though! I can remember back to last summer when I was in St. John with my cousins and it was our goal to open up a fresh coconut. My dad came to the rescue with a machete, hammer, and the 2 story building we chucked it off of. Now its your turn to try and open a coconut!


Chilled Mango Ginger Curry Soup with Shrimp
Author: UCSD Medical Center; adjusted by Brenna Bowers
Makes: 8 servings


Ingredients:
2 ripe mangos (about one pound each), peeled and cubed
½ cup chopped shallots (sweet onion)
1 large clove garlic, chopped
1 teaspoon fresh ginger, peeled and grated
½ teaspoon curry powder
½ teaspoon salt
1 can (13.6 oz) light coconut milk
½ cup coconut water
3 ½ Tablespoons fresh lime juice
1 cup fresh shrimp, deveined and peeled from their shell
3 Tablespoons chopped fresh cilantro

Directions:
In a food processor/blender, combine the mango, shallots, garlic, ginger, curry powder and salt. Blend until it has been pureed (very fine and no chunks). Transfer the mixture to a pot and add the coconut milk, coconut water and lime juice. Bring to a boil and add the shrimp. Cook the shrimp in the mixture until the shrimp turn bright orange in color (that is how you know they are done). 

Cover and chill the mixture and place it in the fridge for about 2 hours. Once fully cold, serve the soup in small bowls and top with fresh cilantro.

Friday, July 1, 2011

Herbed Lima Bean Hummus...

Hummus has become a new craze the last few years and I am all on board! It is a healthy snack and will really fulfill your cravings! Eat this hummus with vegetables or some pita bread!

What is Hummus?
It is a Middle Easter food that traditionally is a dip or spread made from cooked, mashed chickpeas,blended with tahini, olive oil, lemon juice, salt and garlic. (Hummus).

How is it good for you?
Hummus has 2 main ingredients, chickpeas (or some kind of legume (beans)) and tahini. Tahini is toasted sesame paste. The reason for this ingredient is to make the hummus a “complete protein”. Legumes by themselves are an “incomplete protein” but with the combination of both the tahini and legumes, it makes a “complete protein”. Other ingredients that together make a “complete protein” are beans and rice; or peanut butter with wheat toast. 


Herbed Lima Bean Hummus
Author: UCSD Medical Center; adjusted Brenna Bowers
Makes: about 2 cups of hummus


Ingredients:
2 (10 ounce) packages frozen lima beans
1 large onion, chopped
5 cloves fresh garlic, smashed
1 teaspoons salt
¼ cup chopped fresh cilantro
¼ cup chopped fresh flat leaf parsley
2 Tablespoons fresh dill
2 Tablespoons fresh mint
1 teaspoon cumin
¼ teaspoon cayenne pepper
3 Tablespoons fresh lemon juice
4 Tablespoons olive oil
2 Tablespoons Tahini (optional) (Tip 1)
Dash of salt and pepper

Directions:
In a medium saucepan, add 2 Tablespoons of olive oil, onion, garlic and salt. Sauté this mixture for about 2 minutes (stirring once in a while) and then add the lima beans. Cook, covered with a lid, for about 8 minutes.  
Transfer the bean mixture into a food processors (or blender). Add all the rest of the ingredients and puree until it is smooth.

Chill for 2 hours or more and serve with pita bread or chips!


Thursday, June 30, 2011

Cornmeal Flax Seeded Waffles...

Start off your day with a healthy breakfast by making this waffle recipe! Now I must warn you, these are not your average waffles! They are light and rich in flavor and not heavy laden with sugar. So top this wonderful waffle with fresh fruit and syrup/honey. Now get into the kitchen and whip up a batch of your own so you too can talk about how good healthy waffles can be!


Cornmeal Flax Seeded Waffles (Brenna)
Author: Brenna Bowers
Makes: 10-12 waffles

Ingredients:
1 cup all purpose flour
¾ cup yellow cornmeal (fine grind)
2 teaspoons baking powder
1 teaspoon baking soda
2 Tablespoons brown sugar
½ teaspoon cinnamon
¼ cup ground flax seed
3 large eggs
2 cups buttermilk (Tip 1)
4 Tablespoons vegetable oil
1 teaspoon vanilla

Directions:
In a large bowl, combine all the dry ingredients (flour through flax seed) and stir to combine.

In another bowl whisk the eggs, buttermilk, oil and vanilla. Add the flour mixture all at once and whisk just until combined (Tip 2).

Preheat the waffle iron and spray it with oil (or grease it with oil on a paper towel). Place about 1/3 cup of batter into the hot waffle iron (depending on the size of your waffle iron) and cook until the waffle is slightly golden brown (2-3 minutes).

Serve with fresh berries and honey/syrup.

Tip 1: If you have run out of buttermilk, don’t fret because I have a substitute for that! For every one cup of milk add 1 Tablespoon of fresh lemon juice. Let the mixture sit for about 5-10 minutes (it will begin to curdle….foam), stir and use as directed above.

Tip 2: Never overbeat waffle (or pancake) batter! This will make your product come out flat and chewy (opposite of what we want!). So just stir the batter a little bit and leave the small lumps….they will be just fine in there and you will never know once you place the batter into the hot griddle.