Simplicity is key, therefore this is an almost fool proof recipe--unless you don't follow my directions :)
Happy baking!
-Brenna
 |
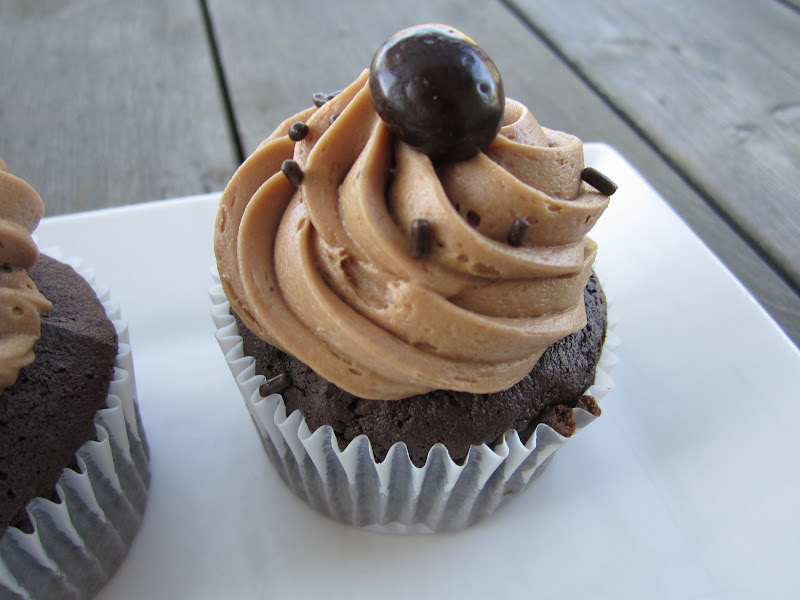
| Java Chip Cupcakes with Espresso Cream Frosting |

 |
 |
| The batter is thick! |
 |
| Notice the hunks of Oreo (from the pudding mix) and chocolate pieces. |
 |
| A very light and moist cake! |


Java Chip Cupcakes with Espresso Cream Frosting
Author: Brenna Bowers
Serving: 24 cupcakes
Ingredients:
Java Chip Cupcakes:
1 cup water
2 Tablespoons instant coffee granules
1 box (16.5 oz.) Duncan Hines “Dark Chocolate Fudge” cake mix (any will do)
1 package (4.2 oz.) Jell-O “Oreo Cookies and Cream” instant pudding
½ cup chocolate chips, chopped
4 egg whites
2 Tablespoons canola oil
Espresso Cream Frosting:
1 Tablespoon instant espresso granules
1 Tablespoon instant espresso granules
1 1/2 teaspoons vanilla extract
1 Tablespoon unsweetened cocoa powder
3/4 cup (1 1/2 sticks) salted butter, room temperature
4 ounces (1/2 package) cream cheese, room temperature
4 cups (about 1 pound) powdered sugar, sifted
24 paper baking cupcake liners
24 chocolate covered espresso beans (optional)
brown sprinkles (optional)
Directions:
Java Chip Cupcakes:
Preheat the oven to 350 degrees F.
Warm the water (20 seconds in the microwave) and stir in coffee granules.
In a large mixing bowl combine cake mix, pudding, chocolate chips, egg whites, oil and coffee-water. Beat until well mixed (about 1 minute). Fill each paper baking cupcake liner three-quarters full. Bake for about 15 minutes.
Espresso Cream Frosting:
In a small bowl, add the instant espresso into the vanilla extract. Once the coffee granules are dissolved, sir in the cocoa powder until it forms a paste.
In a large mixing bowl with a whisk attachment, beat the butter and cream cheese until it is fluffy (about 5 minutes). Beat in the coffee-vanilla-cocoa paste until evenly distributed. Beat in the confectioner’s sugar, one cup at a time, until the frosting is thick and smooth.
Assembly:
Pipe the frosting onto cupcakes using a large star tip. Top each cupcake with an espresso bean and sprinkles.
Chill until ready to serve.